
I have always put 2 Delrins washer together between spring and cup...splitting hairs, not a big deal regardless of where they are placed. My theory is the least friction and wear having plastic-to-plastic.
Install the app
How to install the app on iOS
Follow along with the video below to see how to install our site as a web app on your home screen.
Note: This feature may not be available in some browsers.
You are using an out of date browser. It may not display this or other websites correctly.
You should upgrade or use an alternative browser.
You should upgrade or use an alternative browser.
Team secondary screws and helix install How-To
- Thread starter IQRIDR
- Start date
I
IQRIDR
Well-known member
Some debris is normal as the rollers will shed a little but if you have metal debris and shavings you need to take a real good look at the sheaves, the rollers, and the helix. Grab the rollers and give them a wiggle, if you have much lateral play replace them. Clean everything up real good with some scotch brite.
WB I agree fully
WB I agree fully
When I pulled my helix out last year there was a bunch of metal or probably aluminum shavings in there. Is this common or do I have a problem?
Most of the shavings I have seen are coming from the defection adjuster, deforming it's mating washer and gouging both contact faces. That is where I would look for starters. Some of the more abused were about halfway thru in that spot.
Have your Snap-On dealer replace your conventional torx bit to the gold color bits (W). They don't twist.
Team started using a yellowish color type of thread lock. Once it is shocked, the fastener spins right out.
I use an impact gun to break em loose and have only had 1 out of hundreds ever strip and that was because my T-27 bit was already twisted and back up was broken.
Also, check the bushing in the sliding sheave. They are getting sloppy after 1,000 miles...
J
just-pinch-it
Member
What I found worked well for me was to back out the deflection screw so there is no pressure on the spring and the helix comes out with little effort. Normally can do it with my fingers or at most a slight tap with a rubber mallet and then can pull it right out.
PV
Ditto. The belt deflection adjuster screw has the sheaves cocked and binds the helix in place. Loosen up the adjuster, pull and twist helix clockwise, and out it will come. IMO the one place the bushing needs to go is under the spring cup. The steel spring cup will "eat/stick" into the aluminum sheave with time. Also, with certain springs, I have seen the O.D. fatten slightly and it will stick tight in the cup.
Last edited:
T
Trenchmaster
Well-known member
Good thread, been a while since I've done this but I seem to recall that the circlip needs to be installed a certain way ( chamfer to the outside?) I always marked it so it went back in the same way.
Last edited:
I just picked up a 2012 Switchback Assault.... went to take the clutches apart and found that 3 of the 4 helix bolts are stripped, so I can't get them off. other than Easy-Outs has anyone experienced any other way of getting these things out without damaging anything?
What has worked for me is drill carefully until the head comes off. Once the helix is out of the way, you can usually spin the rest of the screw out by hand. If by chance they are Loctite'd in, a little heat and some pliers make quick work of them.
A
ak49er
Well-known member
Delrin Washers
How it was explained to me:
It's an old racer trick that has made it's way into the consumers bag of tricks.
After time and use, the metal spring cup wears into the aluminum of the clutch. This causes binding and affects the secondaries performance.
To prevent this one Delrin Washer is placed between the metal spring cup and the aluminum face. And this assembly should be checked every pre-season.
Adding the other two does help with smoother shifting. The problem noticed is that the metal tangs on the top and bottom of the spring wear into the Delrin Washer quickly and can cause binding issues, quicker than the metal to aluminum binding that we tried to fix with the first washer. And quicker than the metal to metal contact of the top and bottom of the spring.
The more expensive aftermarket springs that have a full, machined face are less affected by this.
Adding all three helps, but one should then inspect their clutch more frequently, than they would if they just used one.
SLP is selling to the Average Joe, who may not put a lot of effort into maintenance vs riding, so they are covering their @$$ to prevent un-happy customers calling them 250 miles down the road saying their mod made their clutch malfunction.
BTW Great write up! And a guy can do this work with some all thread, washers and nuts, no need for special tools if you don't have access to them.
P
P Money
Well-known member
Have your Snap-On dealer replace your conventional torx bit to the gold color bits (W). They don't twist.
Thanks for the heads up Dave... I just ordered a set of these online... (local SnapOn guy is never around... and I'm small time... free ship). I got an extra T27 replacement insert just in case (FTXB27E2). Tired of the other brand I have breaking.

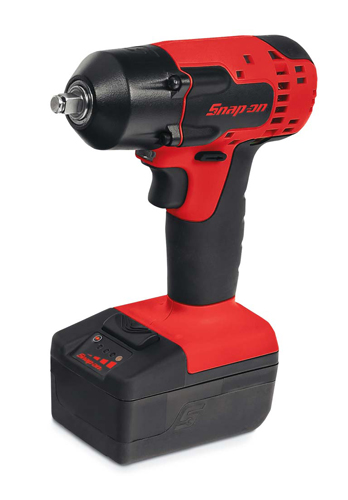
I'm eyeballing the new LIon 18v 3/8" cordless impact for a Christmas present to myself... Pretty darn nice!!
Last edited:
You will absolutely love that 18 volt gun from snap on.
Any thoughts on placing a small amount of copper anti seize on the screws before placing them back in? I'm having to buy new screws every time I go to work on secondary. $8.24 per screw is raping a guy.
I
icr
Well-known member
Any thoughts on placing a small amount of copper anti seize on the screws before placing them back in? I'm having to buy new screws every time I go to work on secondary. $8.24 per screw is raping a guy.
These work much better than stock
https://www.zollingerracingproducts.com/shop-our-store/8fwtwyhsv25n86teasg4wm09suwl6y
Reusing the screws
So no Loctite needed for reinstalling the screws?
I agree 100% something has changed...there's a reason we always stock 20 or so of the screws.
So no Loctite needed for reinstalling the screws?
Any thoughts on placing a small amount of copper anti seize on the screws before placing them back in? I'm having to buy new screws every time I go to work on secondary. $8.24 per screw is raping a guy.
I put a small dab of regular anti-sieze on my helix bolts, making sure I get some on the bevel. Never had a problem with them backing out.
I'm not sure I would run these without Loctite. A little heat and they will come right out.
Quite a bit of heat can be generated by these secondary's. I just worked on one that the fasteners had backed out. Of course I can't say that they were properly torqued when they were installed but many guys don't have a torque wrench.
This isn't the first time I have seen one of these secondary's with backed out torx fasteners.
I always use Loctite and torque to 96"-100"lbs.
Thanks for the heads up Dave... I just ordered a set of these online... (local SnapOn guy is never around... and I'm small time... free ship). I got an extra T27 replacement insert just in case (FTXB27E2). Tired of the other brand I have breaking.
I'm eyeballing the new LIon 18v 3/8" cordless impact for a Christmas present to myself... Pretty darn nice!!
Thanks for posting this up. I needed some replacement Torx for my set and hard to nail down a Snap-on guy. Just ordered those heavy duty ones for my set. Thanks for the links.
Similar threads
Y
- Replies
- 10
- Views
- 679
H
T
- Replies
- 2
- Views
- 478
T
H
- Replies
- 17
- Views
- 2K
D