• Don't miss out on all the fun! Register on our forums to post and have added features! Membership levels include a FREE membership tier.

XP Turbo Build

H

Holomis International

Well-known member
Nov 29, 2008
754
64
28
www.holomis.com
\
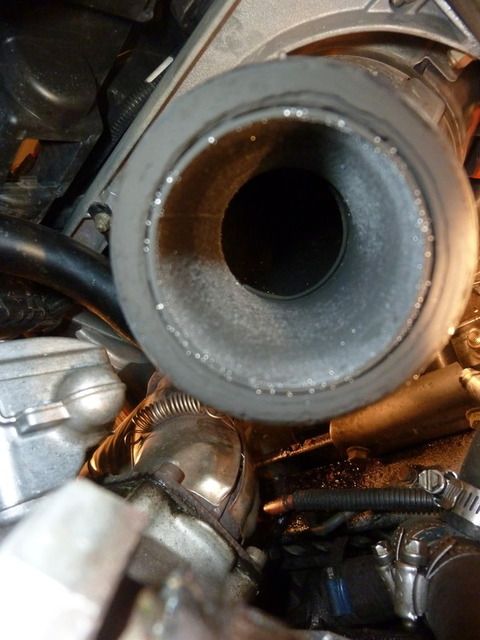
for doing the pipe, you go to where the stinger is welded into the fat part of the pipe, cut around on the fat side of the pipe, just through the outer layer, leaving the stinger intact to make it way easier to get out. you have to go about 1/4" in from the weld as the end of the stinger is flaired inside, and it needs to be able to fit out. take the stinger how that you removed it and then cut the peice that goes into the fat part off.. reweld. done.
QUOTE]

If you cut closer to the current weld, you can pull the end with the stinger out to the flare, cut as close to the flare as you can, and dump the flare out the engine side of the exhaust. Then cut off the remainder of the stinger. When you reweld, it only appears to have been welded one time for a cleaner look. Either way works.

Great thank you for that info!

Jeff
 
H

Holomis International

Well-known member
Nov 29, 2008
754
64
28
www.holomis.com
Turbo kit arrived today, thanks to Bryce from turboboyz for packaging some brand new parts in the used kit that I picked up! Everything looks pretty darn good and after a bit of clean up the kit will look awesome.

So here are a couple pics, sorry about the bad quality. I am just building a Sea can shop at home right now and that is what I am currently tearing the sled down in, at the same time I am building the Sea Can shop, so it is quite challenging, especially since the power hasn't been hooked up yet, I haven't plumbed the wood furnance in yet and my solar panels haven't shown up yet! I would do this at my shop, but with deck season going right now I can't even spare enough room for my sled build (16000sqft of shop and I am building a turbo sled in a Sea can) Oh well it makes things interesting. I will bring it down to the shop when fab time comes around and we get some of the decks shipped out the door. But for now the Sea Can shop is a real Gem!

More progress to come!

Thanks

Jeff

IMG_1897.jpg IMG_1898.jpg IMG_1899.jpg IMG_1900.jpg IMG_1901.jpg IMG_1902.jpg
 

Octanee

Well-known member
Lifetime Membership
Nov 15, 2010
1,188
217
63
44
Cranbrook Bc
good ol sea can, was going to say if you remove your stinger from the pipe, can you take a picture of it?, not sure if i should bother putting the effort in my self or not, thanks
 

Wheel House Motorsports

Well-known member
Lifetime Membership
Nov 27, 2007
29,933
5,968
113
34
SW MT
its so damn easy to do, its not worth risking it being inside there and breaking off and destroying your turbo. first time going slow it took me MAYBE 10 minutes to do in and out.. second one.. maybe 5.
 

Octanee

Well-known member
Lifetime Membership
Nov 15, 2010
1,188
217
63
44
Cranbrook Bc
its so damn easy to do, its not worth risking it being inside there and breaking off and destroying your turbo. first time going slow it took me MAYBE 10 minutes to do in and out.. second one.. maybe 5.


yeah, i guess i am confused on what i am looking for, how big it is, and all that stuff, and your instructions, i guess i wouldnt understand them until i cut it open and seen it, then i would be like oh yeah thats how to do it ha ha,

but if your saying that it could be something to get sucked into the turbo then now i am most certainly going to check for it, on the big pipe, where exactly would it be? more towards the Y pipe up in that area? or more the middle where the U is? (im sorry im just confused at the moment)
 

Wheel House Motorsports

Well-known member
Lifetime Membership
Nov 27, 2007
29,933
5,968
113
34
SW MT
the outlet of the pipe is approx 2" in diameter. that tube extends back into the fat part of the pipe ~6" on the xp pipes. you take the whole thing out of the main pipe and cut out the portion that extends into the fat part..

here is a VERY crude idea on paint, but it should get the idea across. cut where the slash is


pipeexplanation.jpg
 

Wheel House Motorsports

Well-known member
Lifetime Membership
Nov 27, 2007
29,933
5,968
113
34
SW MT
talk to aero, i beleive you supposed to only adjust it by messing with the spring in them as the variable vanes actuate via boost signal, so if they dont see anything until full boost i think you are gonna have issues with a TON of backpressure in the mids as the vanes will stay closed then just fly open once the mbc lets the pressure to the turbo actuator. just a thought, but i have asked them before and they recomended only adjusting via springs/shims.
 

Octanee

Well-known member
Lifetime Membership
Nov 15, 2010
1,188
217
63
44
Cranbrook Bc
the outlet of the pipe is approx 2" in diameter. that tube extends back into the fat part of the pipe ~6" on the xp pipes. you take the whole thing out of the main pipe and cut out the portion that extends into the fat part..

here is a VERY crude idea on paint, but it should get the idea across. cut where the slash is


pipeexplanation.jpg


thanks, looking at a old picture i have, i dont think my sled would have that,
P1000296.jpg
 
H

Holomis International

Well-known member
Nov 29, 2008
754
64
28
www.holomis.com
we have run the turbo smart boost controller alot and works fine.

Glad you got her !!

My understanding is the turbo is set at about 10lbs boost right now. When I put a controller on will I be able to increase this with out changing the spring, or can I only decrease it. In order to increase it would I need to upgrade to the 14lbs boost spring and shim and then be able to use the boost controller to dial it down from 14lbs, is that how it works.

Also what lines are we teeing into on the Aerocharger to make the boost controller work.

Again my turbo is at home so I would probably be able to have a look and figure it out, but I am now at the office and impatiently would like the answer:becky:

Any draw backs/advantages to using the boost controller as opposed to just setting it at 10lbs of boost and leaving it (besides the obvious of being able to increase boost) Does it create lag or have some adverse effect on the turbo.

Thanks

Jeff
 
T

taylorbok

Active member
Nov 10, 2008
426
26
28
pretty sure the aero only has one line that goes to the boost controller or w/e you wanna call it, you cant go bellow the spring pressure with the boost controller only up shouldnt cause any lag issues
 

brycter

Well-known member
Lifetime Membership
Nov 26, 2007
1,537
706
113
West Haven, Utah
www.turboboys.net
the line comes off the air box or boost source and then runs to the accuator. the boost tee fits in that line that runs the accuator and bleeds off the boost making the accuator think that it is not producing enough boost.

you can go up in boost but not down. so most guys out a 7 psi spring in and then a boost tee. to give you some adjustability.

this system of fooling has been done for years probably since 1985 with the hi low switch that gives you 2 lbs.
 
H

Holomis International

Well-known member
Nov 29, 2008
754
64
28
www.holomis.com
the line comes off the air box or boost source and then runs to the accuator. the boost tee fits in that line that runs the accuator and bleeds off the boost making the accuator think that it is not producing enough boost.

you can go up in boost but not down. so most guys out a 7 psi spring in and then a boost tee. to give you some adjustability.

this system of fooling has been done for years probably since 1985 with the hi low switch that gives you 2 lbs.

Thanks for the explanation, I was trying to get my head around how the process worked, makes perfect sense to restrict the flow and "fool" the actuator!

Perfect!

Thanks again

Jeff
 
T

taylorbok

Active member
Nov 10, 2008
426
26
28
I would run one its a pretty cheap trial if you use a china bov, then if you figure its helping put on a quality one
 

Bendy

Well-known member
Lifetime Membership
Dec 11, 2009
941
261
63
Spirit River, AB Canada
Boost Tee

I installed a Turbo Smart boost tee in-line on the reference signal to the waste gate on my Aero 66. I took out the 10 lbs orange spring and installed a 6 lbs green spring. Now when I need the power for a big climb, I just dail it up. I don't feel that boondocking the meadows I need all that power. It's also easier on everything ( reeds, carb boots, bellows etc.). I don't run a BOV, but I'm considering one! I get some pics of my set up.
 
Last edited:
Premium Features