• Don't miss out on all the fun! Register on our forums to post and have added features! Membership levels include a FREE membership tier.

NEW TUNNEL CONCEPT FOR THE 2007 -2010 RMK'S w/pics... WHAT DO YOU THINK?

C
Mar 2, 2009
19
1
3
37
Does anyone know off hand the width of the 07 switchback chassis vs the 07 RMK raw chassis? Will the VE rear bumper work on my 07 Switch? I plan on installing a U-cooler instead of the stock heat exchanger and don't mind doing a little bit of welding if needed.
 

Cardiac Kid

Well-known member
Lifetime Membership
Nov 12, 2001
298
55
28
MH
In looking at this I think there are 2 things making the tunnel seem to have an angle in it. One, the vertical lines are not parallel on both the front and the back section of this concept. The second is there is one central angle point near the back of the set post were the lines all meet. A very minor shift in the line of this concept for the final production would likely improve it's visual impacts.

Love the idea.
 
T
Dec 2, 2007
206
31
28
Kent, WA USA
How tough are the running board edges? I saw one of these down a Fastrax yesterday and while they look sweet, my stock boards are bent as anything from jumping and hitting things and I wonder how the VE parts hold up? They don't weigh anything at all.
 
W
Feb 14, 2009
50
2
8
hey one thing i noticed, not sure if it has been mentioned before, but doesn't having the tunnel slanting like that make the back end of the tunnel much higher? and if so, wouldn't that make it harder to lift, especially for the shorter folk out there? because just with the stock one i noticed that when lifting the back end around it takes a little more upperbody because of the extra hight
 

Super Dave3

Well-known member
Lifetime Membership
Feb 15, 2003
1,095
346
83
61
Klamath Falls OR
Like this

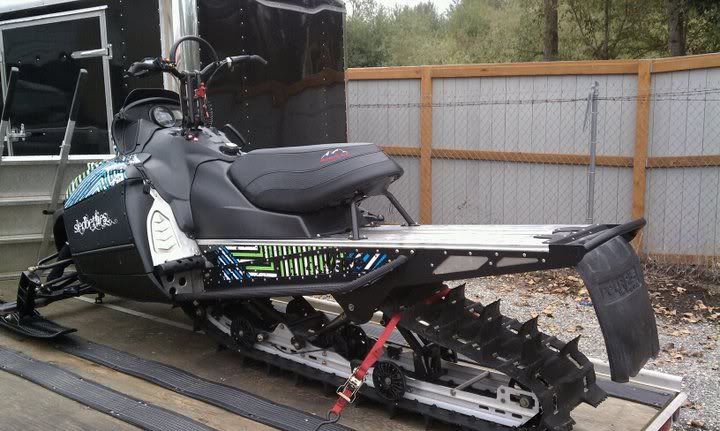
so how about a pic of these things on an actual sled?


1023091706c.jpg

1023091706b.jpg
 

mountainhorse

Well-known member
Lifetime Membership
Premium Member
Dec 12, 2005
18,606
11,814
113
West Coast
www.laketahoeconcours.com
Dave... Looks good, as always with your builds.

I see you left the "windows" open on the rear part of the tunnel... like the looks of that!

This should be a good seller for them, nice to see that VE could make the design work.
 
Last edited:
C

CATKILLER

Active member
Dec 6, 2007
432
27
28
ANCHORAGE,AK
that looks really good.
im kinda bummed that the rear doesnt kick up like it was talked about in the begining but oh well i guess if i want my tunnel to look like a boondock ill have to buy one
 

AKSNOWRIDER

Well-known member
Lifetime Membership
Dec 25, 2007
8,882
4,431
113
62
anchorage
The more that I look at this the more I agree with the earlier posters that there is not much bennefit to going with the whole kit versus just buying the wide running board kit for $300 and the bumper for $189. The only difference I can see is that the whole kit gives you a little bling on the footwell sides and a riveter and some rivets. I would gladly pay the money for the kit if it looked more like a boondock tunnel. I was really hoping that Eric's drawing were going to be close to what the final product was. That way it seperates from the other cheaper options available. THis is just my opinion and in no way a put down to VE I think that they are on the right track and making awesome products for us sledders. Keep up the good work!!

I too was looking for a more "custom look"..so I made my own..I think it came out pretty good..and if enough were interested I would make more of just the sides(allowing you to do your own rivit on wide board kit such as van ambergs or wrp's). the reason is that to do the welded running boards requires each machine to get the fit exactly right...on mine I raised the rear of the running boards 1.5 inches which required also modifying the board supports to rebolt in the stock position and still line up with the raised boards...the bare sides weigh exactly 6.5 pds each made from 1/4 material...(for those who arnt woried about extreme tunnel strength 3/16 or even 1/8 could be used)

Picture251.jpg


Picture255.jpg


Picture259.jpg


these ones I made to brace up a xp tunnel(they are still out at powdercoaters getting the copper hood color done), they are made from 1/8 in. and dont mess with the stock boards(only for tunnel strength)

Picture205.jpg
 

mountainhorse

Well-known member
Lifetime Membership
Premium Member
Dec 12, 2005
18,606
11,814
113
West Coast
www.laketahoeconcours.com
Here is another one...nice to see the evolution of this concept from the start 10 years back when I saw the first Boondock tunnel from Jagged Edge Racing on Lynn Walters Edge...To Vanamburgs Boondock tunnels... to 2007, before this thread, when I presented the idea to Chad at CR... then to Mike at VE... to the finished product we see here.

Mike really took the idea to another level of quality and production!

Looking good Brandy!

alldonewithseat.jpg
 
Last edited:
C

CoyoteGirl

Well-known member
Nov 26, 2007
2,696
1,577
113
Washington
www.brandyfloyd.com
THANKS ERIC! :)

I've helped installed several tunnels and I have to say I'm not sure I'll ever do that again! LOL 6 hours vs 16 hours is a huge start to my reason for making that statement! This kit is just way too cool. From the ease of installation, the looks and the strength! I can NOT wait to get it on the snow!

Thanks VanAmburg for making such a fabulous product! :whoo::high5::clap2::wave::rockon::hail:

Here's a link to my install process:
Clicky
Looking good Brandy!

alldonewithseat.jpg
 
Premium Features