• Don't miss out on all the fun! Register on our forums to post and have added features! Membership levels include a FREE membership tier.

C3 Forward Post Install

S
Jan 16, 2008
373
163
43
36
Lincoln MT
C3 Forward Post Install Instructions

Included with the kit:
2 CNC Post Forward Brackets
4 10mm Short Bolts
2 10mm Long Bolts
6 Ny-Lock Nuts
Optional Straight Chromoly Steering Post
Optional Pre Modified Lower Blocks

Tools Needed:
Socket Wrench
10mm wrench
10mm socket
Extension
13mm socket
16 mm wrench
17mm wrench
Drill or Grinder or Hammer and Chisel

Tools and Detailed instructions on how to remove the hood, sides panels, dash/headlights, tank shroud, airbox and seat are not included.


1) Remove seat
2) Remove hood
3) Remove side Panels
4) Remove dash and headlights
5) Remove tank shroud
6) Remove front plastic piece
7) Remove exhaust pipe
8) Remove the air box
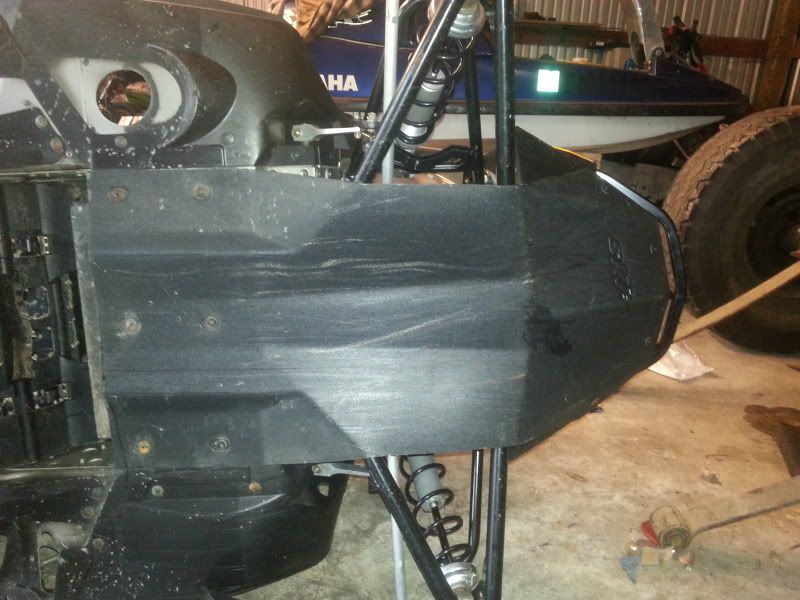
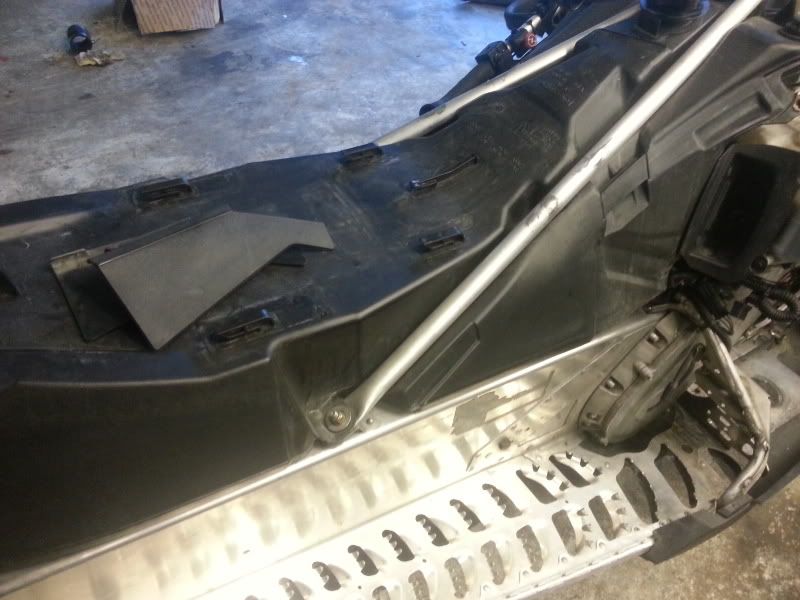
9) Remove the (10) rivets holding the bottom skid plate on. (Mine spun when trying to drill so I used a hammer and chisel)

20130409_184120_zps0c8afb77.jpg


10) Remove the (2) bolts holding the tie rods to the steering post. Once they are removed you can remove the (2) 10mm bolts holding the lower steering block in.

20130409_190425_zps4b6bc283.jpg


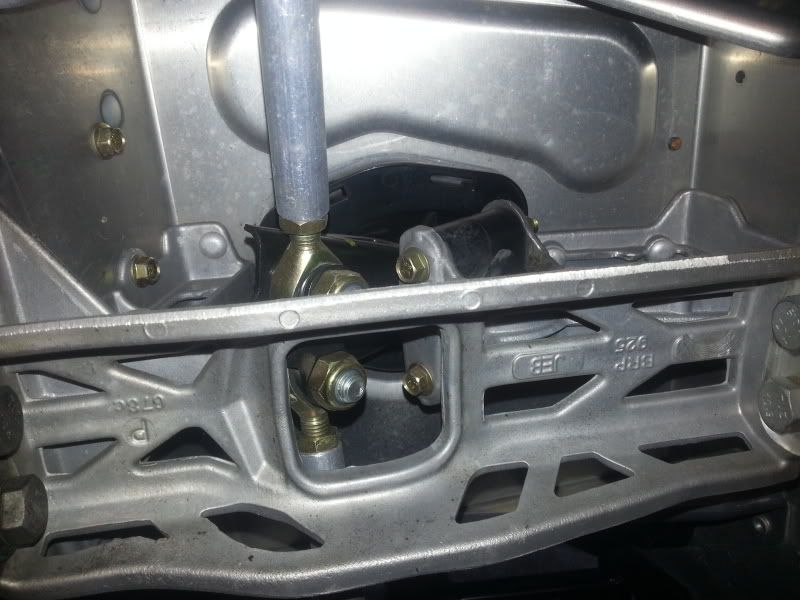
11) Remove the (4) 13mm bolts holding the steering riser on and put it aside.

20130409_190327_zpsfe79e08b.jpg


12) Remove the (2) long 10mm bolts holding the upper steering block in, and the (2) 10mm holding the small side supports.


20130409_191651_zps1e570490.jpg


13) Remove the plastic shrouds in middle of tank by pulling out on the bottom then up exposing the (2) 13mm nuts holding the tank and rear triangle on that can then be removed. Then lift the rear of the tank and pull the triangle off of the sled.

20130409_191643_zpsaaa0571f.jpg


14) Pull the plastic cover up from the belly pan towards the engine compartment then pull it off of the shroud.

20130409_191511_zpsc004b99c.jpg


15) You can then pull the factory steering post out from the bottom and then out of the sled.

20130409_191517_zps104a7a02.jpg


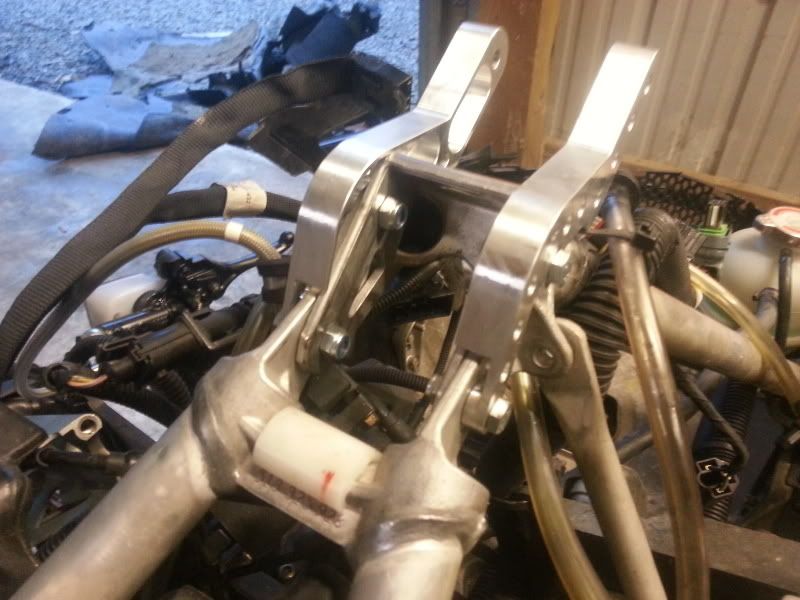
16) Place your rear triangle back and loosely put your C3 Brackets on using the (4) supplied short bolts and ny-lock nuts. Be sure to route your throttle cable up through where the factory post went. And put the fuel tank vent under the small support.

20130409_193421_zps68c98e6b.jpg


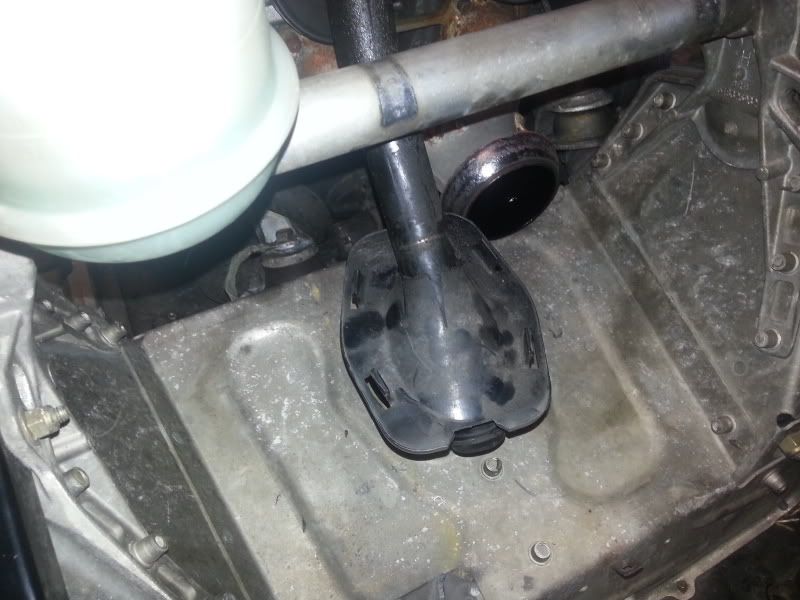
17) Then place the modified lower blocks on the steering post with the upper grinded half facing forward and the lower grinded half facing back. This allows the steering post to lean forward.

20130409_194009_zps7e5f8c7c.jpg


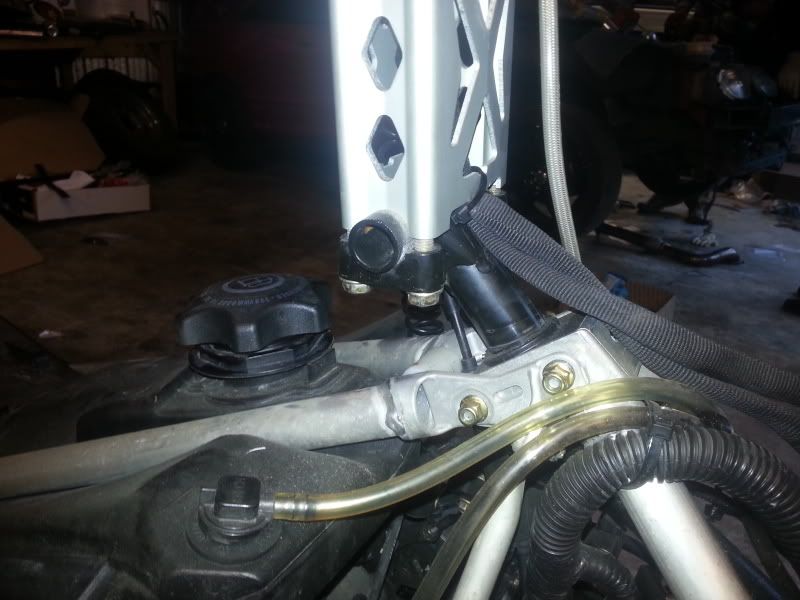
18) Then you can place the steering post down through the belly pan. Now set the original (2) 10mm through the lower block and mounting bracket and hand tighten the nuts.

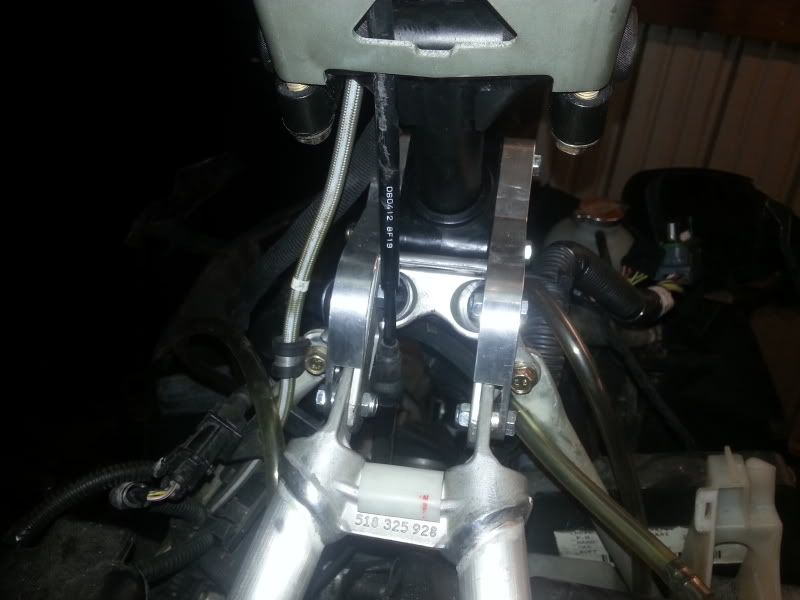
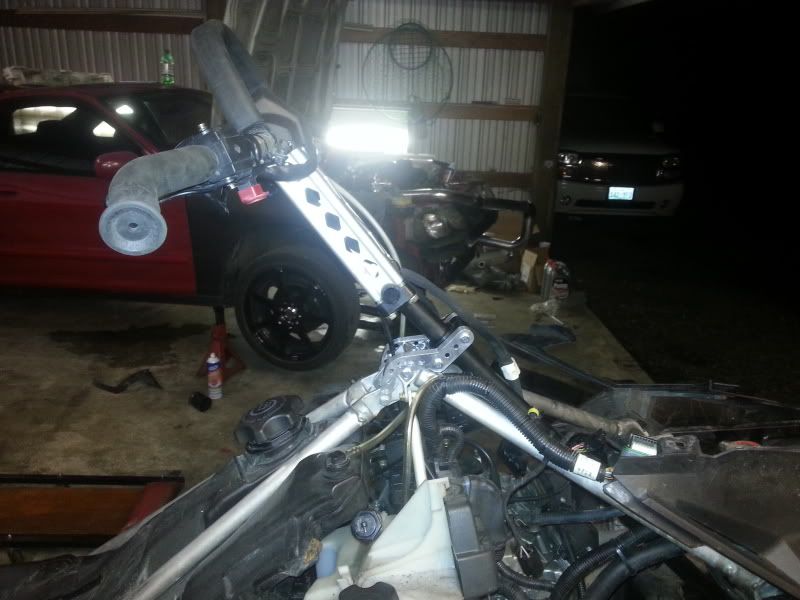
19) Reuse the factory upper block and put the steering post in the C3 CNC Brackets and use the (2) long 10mm supplied with the kit to secure the upper block into the brackets. (Here you can see the best routing for the throttle cable and fuel tank vent)

20130409_203557_zps0a7996cc.jpg


20) Tighten the (6) 10mm bolts on the C3 Brackets.

21) Tighten the (2) 13mm bolts that hold the tank and rear triangle on and you can put the plastic pieces back.

20130409_191643_zpsaaa0571f.jpg


22) Put the steering riser back on and roughly inline with the new steering post.

20130409_203609_zps3239f27f.jpg


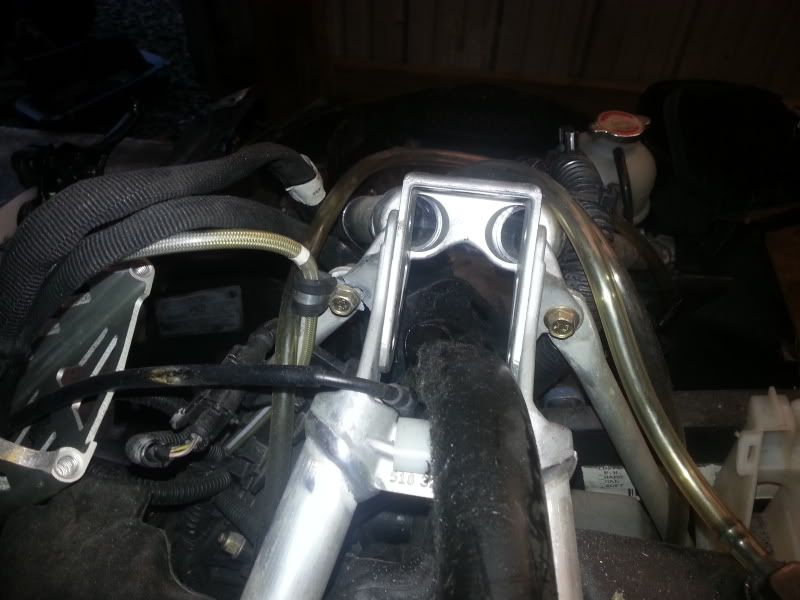
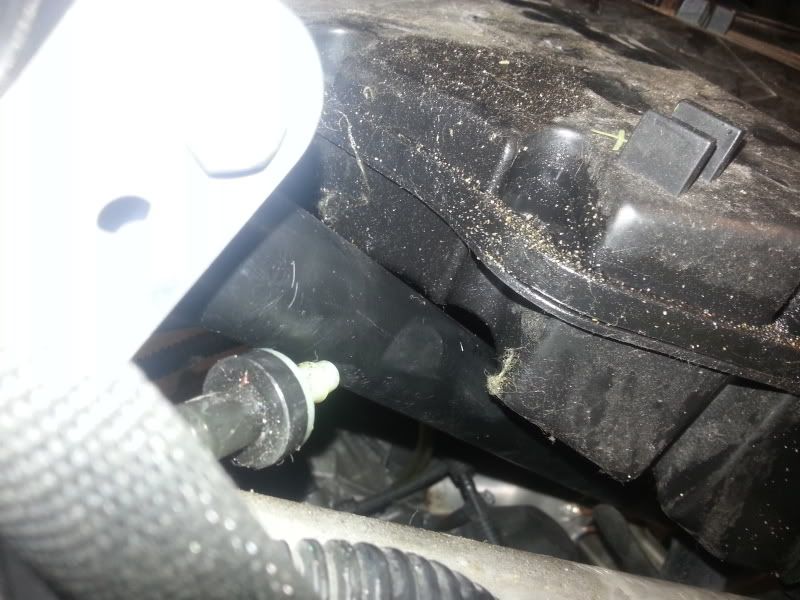
23) Here you can see where the steering box needs to be modified and why.

20130409_201216_zps5b211eb9.jpg


20130409_201206_zps22b351d4.jpg


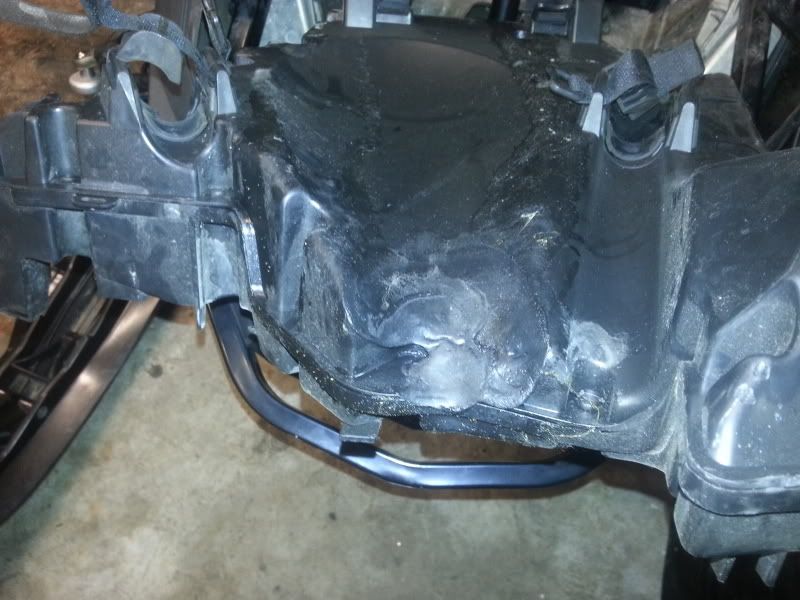
24) Heat up the air box with a heat gun and use a pipe to mold it to fit around the steering post. Pictured is C3’s chromoly straight post which requires much less modifying, and is worth the price ;-)

20130409_203004_zps002d0d78.jpg


25) Tighten the (2) 10mm bolts holding the lower block under belly pan.

26) Reinstall and tighten the (2) 16mm bolts holding the tie rods on.

27) At this point you can reinstall all the body work, dash and plastics. You will need to trim your tank shroud a bit to fit.


-SeanC
 
S

swrev

Well-known member
Jun 26, 2008
952
349
63
Lewistown, MT
Run your wires on the opposite side of the T in the post and have them go the same place you have the throttle cable. It makes for a cleaner looking install. Just don't reinstall the foam. Just my personal preference, I've got a sled each way.

How is it that the C3 post requires less modding of the air box? One of my sleds is is C3 and other has freestyle post. Both contact air box in the same spot.

Nice pics. Here is a shot of mine w/ a 1" riser off the C3 post. Haven't had a chance to try it. Had a 4" before. Brake line is way to long now.

short riser.jpg
 

hivoltagesledhead

Well-known member
Premium Member
Nov 27, 2007
2,181
688
113
Nakusp, BC
Nice....but you dont have to remove the skid plate. The steering post plastic can be removed from the bottomand the stock post will come out the top. This will save you time and frustration.
 

backcountryislife

Well-known member
Lifetime Membership
Nov 26, 2007
10,893
7,413
113
Dumont/Breckenridge, CO
what is the advantage in doing the post forward mod?

A somewhat more vertical post, decreasing the arcing motion, and the ability to run the riser inline with the post & still get the height some need, and keep you forward at the same time.

If you run a riser straight off the post & are still using a stock 7" post on an 09 for example, it puts you in the back seat as a rider, limiting forward motion. For that same rider if you move the post location more vertical & the 3" forward you now can have the same bar position & more direct steering, or you have the ability to move the bar position more forward and have better control of the sled by being able to get yourself further forward.

If you ride an XM back to back with an XP, some of this change has been made, which allows you to see a bit of what this does. The XM is 2" forward of the XP, the C3 setup is 3" forward on an XP, and the XM version moves it 2" forward from an XM location as well.
 
C
Feb 28, 2011
195
46
28
note

Just a note, be sure to buy the C3 modified lower block with the straight post kit! When we installed this on a friends 08 Summit, it was a PITA to get the lower post block widened out enough and in the right shape so the post wasn't binding and hard to turn. took hrs. The modified block is well worth the extra small cost
 

backcountryislife

Well-known member
Lifetime Membership
Nov 26, 2007
10,893
7,413
113
Dumont/Breckenridge, CO
Just a note, be sure to buy the C3 modified lower block with the straight post kit! When we installed this on a friends 08 Summit, it was a PITA to get the lower post block widened out enough and in the right shape so the post wasn't binding and hard to turn. took hrs. The modified block is well worth the extra small cost

Did you watch the video he has on youtube? He makes it look super easy, and it only takes a few minutes.

I was planning on just doing that... but you've got me thinking if I should buy instead. I'm pretty handy with my trusty dremel tool though...:D
 

winter brew

Premium Member
Lifetime Membership
Nov 26, 2007
10,016
4,332
113
56
LakeTapps, Wa.
For the XM, the stock lower block cannot be used....even modified. It's probably easiest to just buy the old style block from C3 since you would have to buy a new/different block anyway.
 

backcountryislife

Well-known member
Lifetime Membership
Nov 26, 2007
10,893
7,413
113
Dumont/Breckenridge, CO
For the XM, the stock lower block cannot be used....even modified. It's probably easiest to just buy the old style block from C3 since you would have to buy a new/different block anyway.

In the XM kit they specifically offer the modified block as the only option. If this isn't the case & you need something else, it make sme wonder if they've even done one of these things themselves?

Seems like there's a decent amount of misunderstanding in these... SWrev says the mods are the same no matter which post, and he has both. Just seems like they need to get some stuff figured out. I want to do this pretty badly, but I'm bothered by these little things.
 

winter brew

Premium Member
Lifetime Membership
Nov 26, 2007
10,016
4,332
113
56
LakeTapps, Wa.
That is correct, their block is needed for the XM.....just saying you can't modify your stock XM block....at least not easily.
 

backcountryislife

Well-known member
Lifetime Membership
Nov 26, 2007
10,893
7,413
113
Dumont/Breckenridge, CO
That is correct, their block is needed for the XM.....just saying you can't modify your stock XM block....at least not easily.

but they're saying that what they're giving you is just a MODIFIED stock block.

They also don't mention anywhere in the page for the XM that it's needed... in fact they make it seem like it's NOT needed after 2010.


not sure why YT tags never work for me...

http://www.youtube.com/watch?v=AnzNwwhs3eU&list=UUadbsOblUAJjuXu9vXPUewg&index=2
 
Last edited:

winter brew

Premium Member
Lifetime Membership
Nov 26, 2007
10,016
4,332
113
56
LakeTapps, Wa.
I just checked the Doo parts page...the block needed for this, and the one C3 is supplying (modified) is from 2011 and prior. They changed to a different style block in '12.

It could be that you can use the stock (newer) block (with rubber seals) if you use the stock post.??? The C3 post definately requires the old style bushing. I have only installed these with the C3 post.
 
Last edited:

backcountryislife

Well-known member
Lifetime Membership
Nov 26, 2007
10,893
7,413
113
Dumont/Breckenridge, CO
I just checked the Doo parts page...the block needed for this, and the one C3 is supplying (modified) is from 2011 and prior. They changed to a different style block in '12.

It could be that you can use the stock (newer) block (with rubber seals) if you use the stock post.??? The C3 post definately requires the old style bushing. I have only installed these with the C3 post.

Weird.


Clearly you can't simply order this online, as they don't have their SH** together!:face-icon-small-sho I suppose I'll just call & make sure of WTF I'm getting before I spend the $$. I think I'll just stick with the stock post, as the difference from a little modification to "extensive" doesn't mean much to me.
 
S

swrev

Well-known member
Jun 26, 2008
952
349
63
Lewistown, MT
I don't have a pic of Freeride post next to C3. Comparison shot is of '09 post. That would make it look like you would have to some major melting to make work as the bend is very close to the mounting point.

A few shot of both posts installed. Freeride has much different bend than earlier XP posts. Very easy to mod the airbox to and not much different than w/ the straight post. You have to imagine where the air box would contact by looking at the post vs the spar tubes. Almost identical amount of material to move. Freeride post is cheaper and stiffer if XP riders are looking at this. No complaints w/ C3 post, just doesn't feel as sturdy. Not sure how the XM bend is, but it similair to Freeride, I'd stay stock post if it was me unless air box is way different.

No idea on blocks w/ newer sleds, again ordered one set and dremelled the other. If you've got a die grinder, only takes a couple of minutes. Not sure how the o-ring style blocks would be to modify.

c3 bracket.jpg Photo182.jpg 880 in.jpg Photo189.jpg
 

free2fawl

Member
Lifetime Membership
Nov 19, 2010
48
17
8
61
McCall ID
Here's what I did

Bought the C3 mounting kit and copied off a set of instructions from a different thread. Thank you. I f you make your own post you do not have to take any of the frame apart. Once I had it unbolted I cut it right at the lower bend. Pulls out easy now. I cut the top off to alleviate the bend just below the upper set of blocks. I cut the bottom off just above the upper weld of the reinforcement for the steering rod mount. Next I got lucky. At the lumber yard I found the piece. A downrod extension, brushed nickel,3/4"x24", threaded on both ends for 10$. And yes, you can actually screw the new tube into both pieces of your stock post before welding. If you have a dremel tool the lower blocks are very easy to modify. Changing the post angle made the front of the collar above the lower blocks rub where it mounts. Dremel Tool again. Took a couple times to get the blocks right and the post moving freely. Tomorrow I can put it back together and hopefully ride this weekend.
 
D
Nov 26, 2007
371
46
28
Tieton,Wash
so it is best to purchase their straight post. I have a 08, and from what I understand, it will have the curved post? C3 sells a straight post along with their kit also? You need a straight post?

Thanks
 
S

swrev

Well-known member
Jun 26, 2008
952
349
63
Lewistown, MT
Straight post or Freeride post will work. '08 and '09 have to be changed to one or the other. Not sure on '10 XP. I believe '11 and up you can leave stock post.

For guys cutting and adding a straight section. Move your tie rod mounting holes while you are at it to the newer post position. If I remember correctly it is 10mm closer to the post. Makes steering easier.
 
Premium Features