• Don't miss out on all the fun! Register on our forums to post and have added features! Membership levels include a FREE membership tier.

Install: Skinz Protective Gear "Air Frame" Boards, Yamaha Nytro

christopher

Well-known member
Staff member
Lifetime Membership
Nov 1, 2008
81,512
27,373
113
Rigby, Idaho
So.
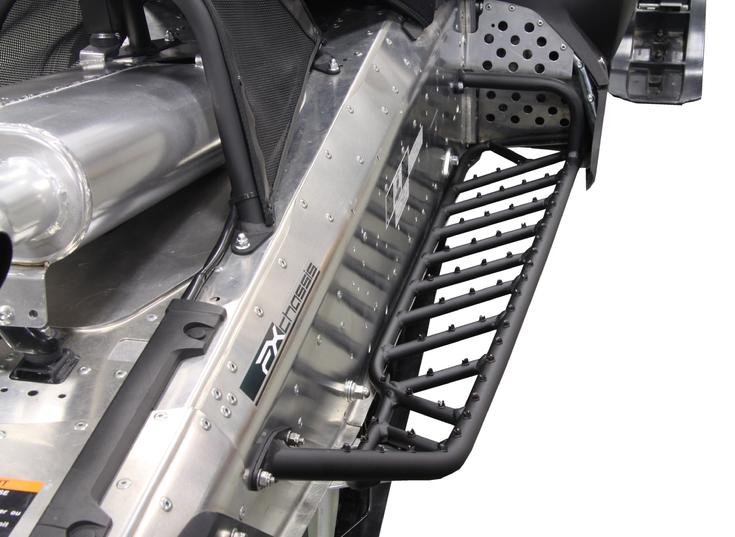
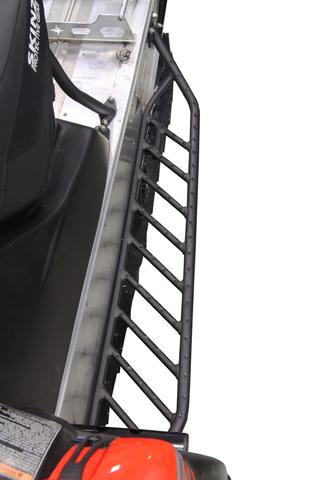
Now that I am finally getting close to actually INSTALLING these things after months of very slowly getting the sled prepped, I am wondering about the 0.75 inch lip that Skinz had me cut for the boards to rest on.

As you can see from the photo there is more than just a little of that lip protruding under the main tube that rests against the tunnel wall, and I am wondering just how much of that I can safely trim back???

While I am not there yet, my guess is the Rivets are the reason they want the extra metal left hanging there, but I am really not sure yet.

As I said earlier, my plan is to epoxy the boards to the tunnel first, then drill, then rivet them with the expectation that the epoxy will add a "Lot" of additional structural integrity and stiffness to the whole system.
 

christopher

Well-known member
Staff member
Lifetime Membership
Nov 1, 2008
81,512
27,373
113
Rigby, Idaho
Went looking at the Skinz site that now has the boards advertised and saw this image. Looks to me like I can TRIM that lip WAY BACK.....

735_SPG_Nytro_MTX_SE_Airframe_Running_Boards_YAFRB150.jpg


320_SPG_Polaris_IQ_AirFrame_Running_Boards_PAFRB100-FBK_Pic_2.jpg
 

christopher

Well-known member
Staff member
Lifetime Membership
Nov 1, 2008
81,512
27,373
113
Rigby, Idaho
Ya you can take more off....it will be harder to keep a nice straight edge though, and make sure you clean it up real nice when your done. Whats this epoxy idea all about?

Ya, seems like there is more than enough lip, so I think I will trim it back a bit this afternoon and see if I can't clean it up some to make a nice smooth edge.

One of Skinz testers used the new epoxy that Polaris is using to glue their sleds together to save weight and reduce rivets. He said they had VERY good success with it, so I bought a couple tubes of the same stuff.

The stuff is thermal active, so you can run a hot air gun over it to cause it to release. Would trash my powercoating, but if I ever had to get them off the tunnel, I could drill out the rivets and then heat the epoxy up so it will release.
 

mountainhorse

Well-known member
Lifetime Membership
Premium Member
Dec 12, 2005
18,606
11,814
113
West Coast
www.laketahoeconcours.com
Originally Posted by Thistledoo ... Whats this epoxy idea all about?

The Lord 400 series adhesives are a super high strength two part structural adhesive.

When you simply use rivets spaced out on the assembly you have stress risers localized to the rivets. When you use a structural adhesives, the loads are distributed along the entire interface between the two parts.... much stronger and more resistant to damage from accidents that come our way.

This turns the board/tunnel into a Monocoque assembly similar to high end performance autos and other power sports equipment.

This also helps to keep the chassis rigid and less prone to damage.

The beauty of the Lord 400 series is that if you heat it above, I believe, 500 F, the adhesive releases in the event you need to replace the part. Polaris uses this in their new Pro-Series sleds. Good stuff with a long track record.
 

mountainhorse

Well-known member
Lifetime Membership
Premium Member
Dec 12, 2005
18,606
11,814
113
West Coast
www.laketahoeconcours.com
Any idea if a polished aluminum surface will cause problems with adhesion of the Epoxy??

The 406 is not an epoxy... it is a high strength acrylic structural adhesive...much different from epoxy.

YES... the polished surface will NOT bond as well as one that has some "tooth" to it.

Polish the tunnel, mock up the boards... mark it with a china-marker where the parts will get the adhesive....

Pull the part, use some good quality 3M green masking tape on the polished surface... rough it up with 60 grit where the parts will join.... Wipe it off with acetone until you get a clean rag...

For the Airframe parts... do the same marking and sand off the powder coat where the adhesive will be and wipe that as well.

You wont even need to use as many rivets on the tunnel/board junction with the adhesive as the adhesive provides the majority of the strength in the joint.

Heck...Caterpillar uses this same adhesive in a lot of their new earth moving equipment for panels and cab parts.

Good luck!
 

mountainhorse

Well-known member
Lifetime Membership
Premium Member
Dec 12, 2005
18,606
11,814
113
West Coast
www.laketahoeconcours.com
You have to have all of your ducks in line...

Have all of your parts laid out.. the adhesive ready... rags, acetone, nitrile gloves, rivet guns, rivets etc.

If you don't have a pneumatic rivet gun... buy one (Grizzly.com has a great one at a great price ... the Harbor Freight one is a POS and costs 75% of the Grizzly)

OR

Borrow one.

Don't try this operation with a hand-powered rivet gun.

The "6" in the "406" indicates the open work time... so you have to be fairly quick with this stuff.... Get someone with focus and patience to help you.

Do a dry-fit exercise before going to the adhesive so you know what to expect and you don't have any bottlenecks.
 

mountainhorse

Well-known member
Lifetime Membership
Premium Member
Dec 12, 2005
18,606
11,814
113
West Coast
www.laketahoeconcours.com
Christopher: ...the alignment will have to be EXACTLY correct???

Yes.... That is What Clecos are for... Drill one hole... put in a Cleco....drill the next, cleco... etc... that way, all of your holes are pre drilled and perfectly aligned.

You cant expect to use the adhesive and "drill as you go" after you put the adhesive on... it cures too quickly for that.

Cleco set

You can get them on Jegs.com Amazon, Ebay, Summit racing.com or from any aircraft tool supply...
They come in different sizes, so order the proper size for your rivet holes.

Use a good sharp (new) bit for drilling so that your drill does not wander.

CLECO kit.
sheetholders.jpg

55580407.jpg


555cleco_hand.jpg


HS-13.jpg
 

christopher

Well-known member
Staff member
Lifetime Membership
Nov 1, 2008
81,512
27,373
113
Rigby, Idaho
Yes.... That is What Clecos are for...
I have never even heard the word before!!

These temporary, reusable fasteners are the fabricator's best friend. Once you've used them you'll wonder how you ever managed without. Install them as you drill holes that are to be riveted at a later time. The Cleco will clamp the parts together and maintain perfect alignment. When all holes are drilled you can quickly disassemble the piece for deburring or for other fabrication steps. The standard Clecos have a 1/4 inch maximum grip
 

christopher

Well-known member
Staff member
Lifetime Membership
Nov 1, 2008
81,512
27,373
113
Rigby, Idaho
After test fitting the boards on both sides I decided that there was too much lip left over from the tunnel under the boards and wanted to trim it down a bit for a tighter/cleaner fit.

Board showing excess lip beneath it.
picture.php


I marked the excess with a Sharpie to make it clear for trimming
picture.php


The final amount for the 2nd cut.
NOTE, the amount of the lip that needed to be trimmed varied slightly from front to back.
picture.php
 

christopher

Well-known member
Staff member
Lifetime Membership
Nov 1, 2008
81,512
27,373
113
Rigby, Idaho
Took the grinder out and made a thin slice down both sides, the deburred the top and the bottom of the lip.
picture.php
 

christopher

Well-known member
Staff member
Lifetime Membership
Nov 1, 2008
81,512
27,373
113
Rigby, Idaho
Something I notices this evening that I wish I could fix, but can't.

The very rear of the boards does NOT come up close to the tunnel like the rest of the boards do.
picture.php


The 0.75 trim for the lip is actually a bit short back here.
picture.php


While there IS support, I think a bit more lip would have done better.
picture.php


If I had the chance to do it over again.
To the rear of the small cut where the tunnel bends just slightly, I think I would have gone for 0.90 rather than 0.75 and offered just a bit more support. I seriously doubt that this will have ANY impact at all, but its always better to be stronger.
picture.php
 

christopher

Well-known member
Staff member
Lifetime Membership
Nov 1, 2008
81,512
27,373
113
Rigby, Idaho
Ready for the next step now.

This week I am going to grind off the powder coating along the bottom of the inside rail that will be mounted to the lip on the tunnel. This is being done to ensure the best possible adhesion of the Lord 406 bonding agent.

When that is done I will clamp the boards in place and pre-drill all the rivet holes.

The final mounting of the boards may be delayed as Skinz wants you to re-install the Upper Track wheel support brackets on the tunnel that the boards use as the rear supports, and I am planning on replacing the stock track on the sled. So I am not sure what I am going to do yet as the new Camoplast track won't be available till the end of October...
 

christopher

Well-known member
Staff member
Lifetime Membership
Nov 1, 2008
81,512
27,373
113
Rigby, Idaho
Took some weight measurements today.

Old boards that were cut off.
52.4 ounces (each)

New Boards
69.4 ounces (each)

Traction Studs
4.8 ounces per side

Rivets
5.2 ounces per side

Bolts
1.7 ounces per side


TOTALS

OLD = about 107 ounces removed

NEW = 161.7

Net Gain = + 54.8 ounces
 

christopher

Well-known member
Staff member
Lifetime Membership
Nov 1, 2008
81,512
27,373
113
Rigby, Idaho
So I ran into a little problem last night.

I drilled the tunnel and installed the rear bolts for the boards.
Bolted the front into the pre-existing bolt holes and clamped down the entire boards to the tunnel lip.

Then I slid the sled jack under the sled and lifted it up into the air so I could drill all the holes for the rivets. Sure enough, the sled lift arms come exactly where the drill bit has to go. Slid the tunnel to the left, to the right, not a chance.

Lower the sled down, remove the lift, and there is not enough ground clearance to get the drill under the lip. This baby sits LOW to the ground with no suspension in her.

No problem says I, I will just roll her over on her side and then drill.
Ya, RIGHT!

Ain't gonna happen with this one boy pulling on her.
Not to mention each time I pull her over it looks like the tunnel is going to get permanently Tweaked.

So this afternoon the call will go out to a couple buddies to come and give me a hand in rolling her over onto her side so I can get on with this Never Ending Project.
 

christopher

Well-known member
Staff member
Lifetime Membership
Nov 1, 2008
81,512
27,373
113
Rigby, Idaho
My never ending project.....

Got the boards mounted onto the sled in preparation to drilling all the wholes for riveting. Bolted in the front and rear, and clamped all along the base to hold it in position.

picture.php
 

christopher

Well-known member
Staff member
Lifetime Membership
Nov 1, 2008
81,512
27,373
113
Rigby, Idaho
The rear mounting point has to be drilled and bolted into place, whereas the front uses the pre-existing bolt holes from the old foot brace.

picture.php


Skinz supplied the bolts and nylock nuts.
picture.php
 

christopher

Well-known member
Staff member
Lifetime Membership
Nov 1, 2008
81,512
27,373
113
Rigby, Idaho
Rolled the sled over on her side to expose the lip on the tunnel, and marked off a dot every 2 inches for drilling.

picture.php


picture.php
 

christopher

Well-known member
Staff member
Lifetime Membership
Nov 1, 2008
81,512
27,373
113
Rigby, Idaho
Drilled a couple holes, then set the Cleco Pins in them to lock them in place and ENSURE there was NO MOVEMENT while I drilled the next holes.

picture.php


picture.php
 

christopher

Well-known member
Staff member
Lifetime Membership
Nov 1, 2008
81,512
27,373
113
Rigby, Idaho
All the holes are drilled and perfectly aligned.

picture.php


Next step will be to remove the boards and grind off the powder coating from the inside edge of the bar making contact with the tunnel lip to ensure the best possible seal for the bonding agent.
 
Premium Features