Install the app
How to install the app on iOS
Follow along with the video below to see how to install our site as a web app on your home screen.
Note: this_feature_currently_may_not_be_available_in_some_browsers

PRO RMK build my way
- Thread starter LoudHandle
- Start date
You are using an out of date browser. It may not display this or other websites correctly.
You should upgrade or use an alternative browser.
You should upgrade or use an alternative browser.
Pics are linked directly from my SW photo album
Not sure why, they work for me and are all loaded into one of my SW albums and linked to the thread from that album.
I Can't see any of your pics anymore?
Not sure why, they work for me and are all loaded into one of my SW albums and linked to the thread from that album.
I
I'm on iPhone and they work.
My Brake Choice
For reference here is the stock QD Disk

Stock QD Brake Disk; 835 Grams
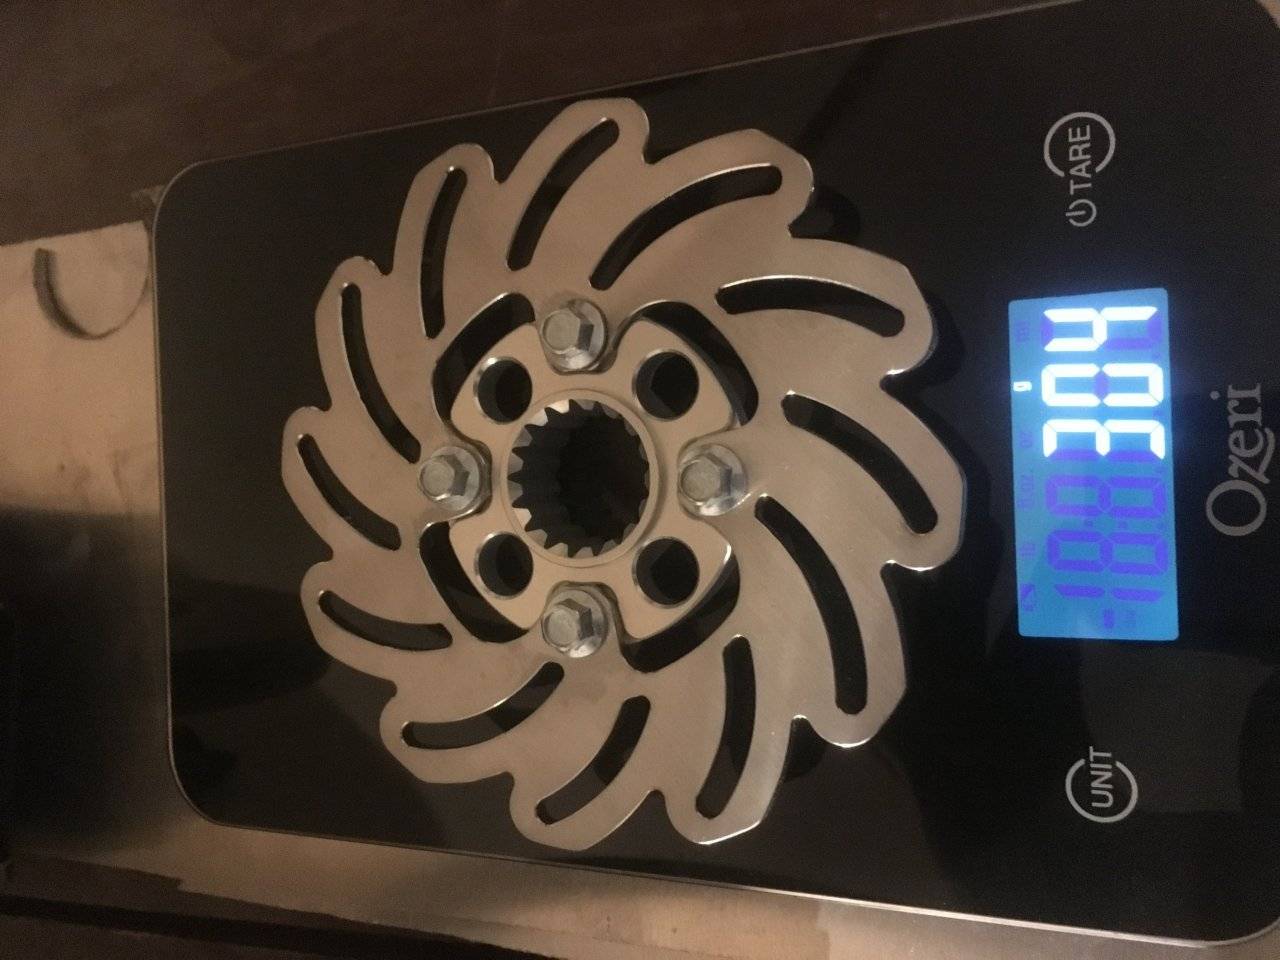
Stock Yeti Brake with the 28mm 17 Tooth splined hubs that they used thru MY '17; 304 Grams
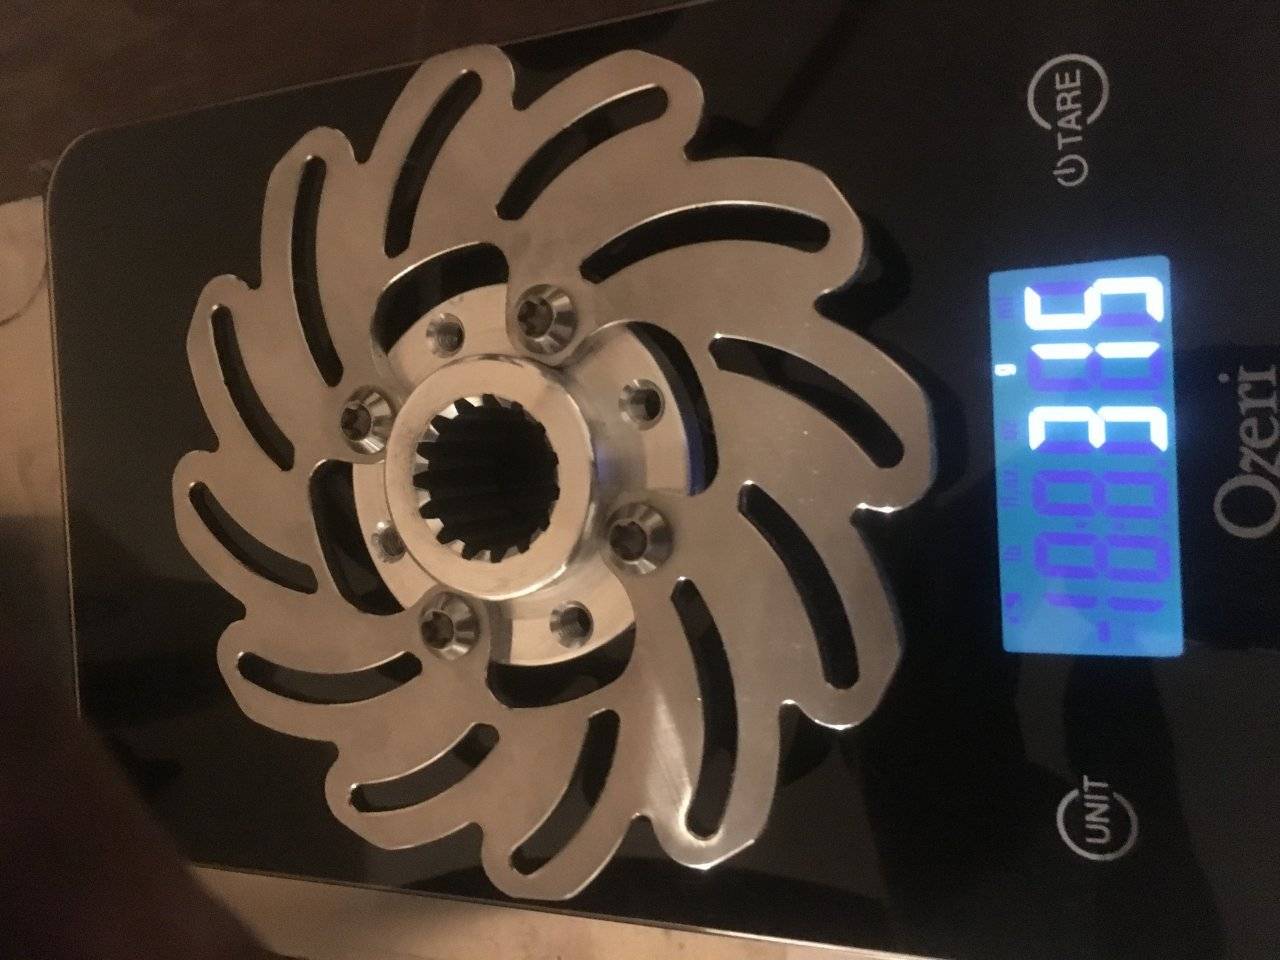
My re-hubbed Yeti disk (it is now a 1" 15 Tooth spline). As a note the MY '18 Yeti's should have 1" 15 Tooth hubs from a brief conversation with Kevin. The 1" 15 Tooth hub I machined from some old aluminum triple roller chain gears and used some Titanium Bolts; 315 Grams, the real MY '18 1" 15 Tooth Yeti hubs should save a few grams.

Where the brake will reside on my sleds. Under the driven clutch on the drive shaft (I've removed the plain bearing end and installed another splined end on the aluminum shaft.
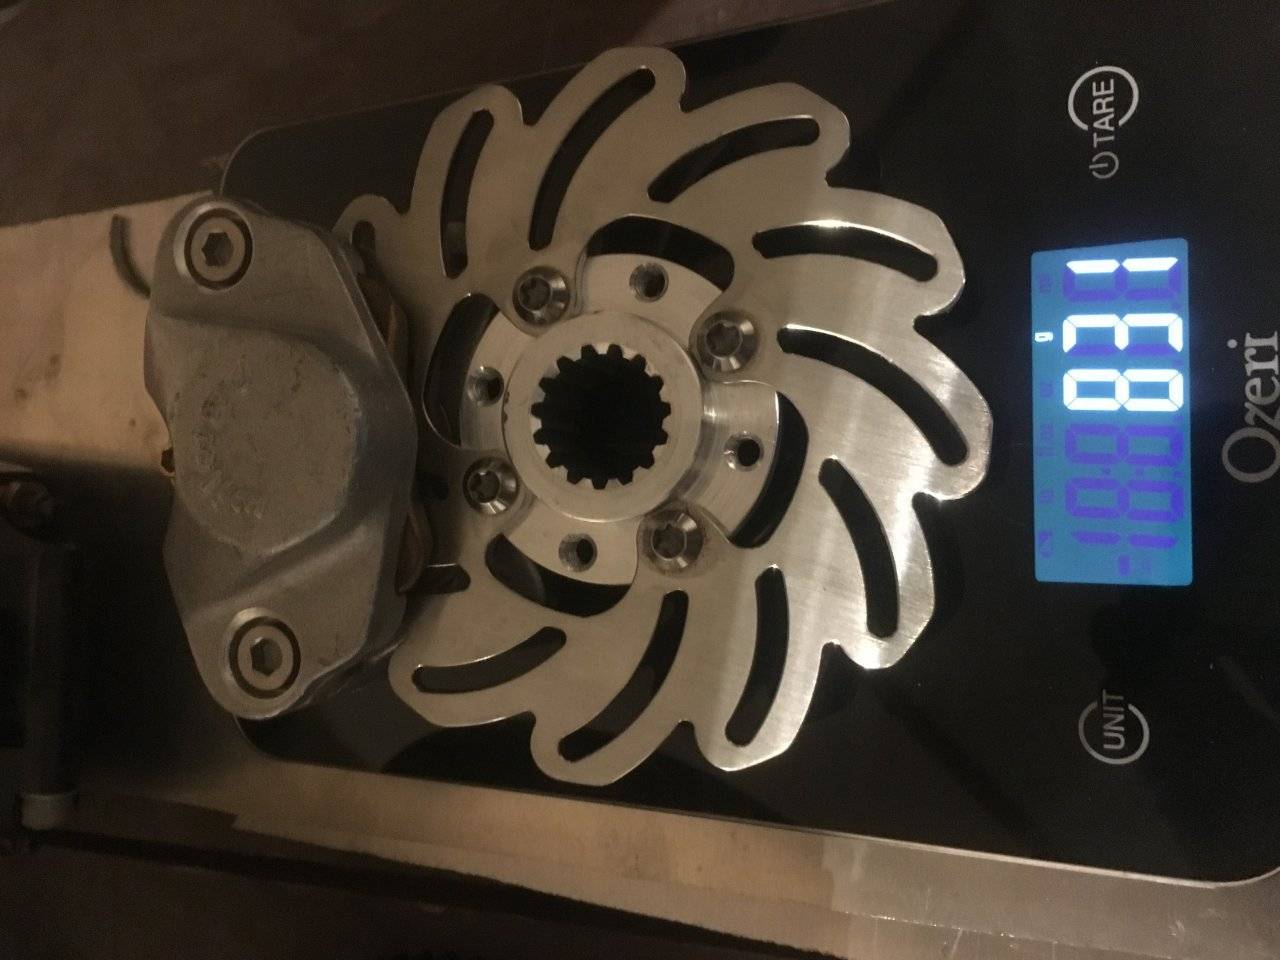
My re-hubbed Yeti disk with my customized Wildwood caliper; 831 Grams, 4 Grams Lighter than the stock disk alone!
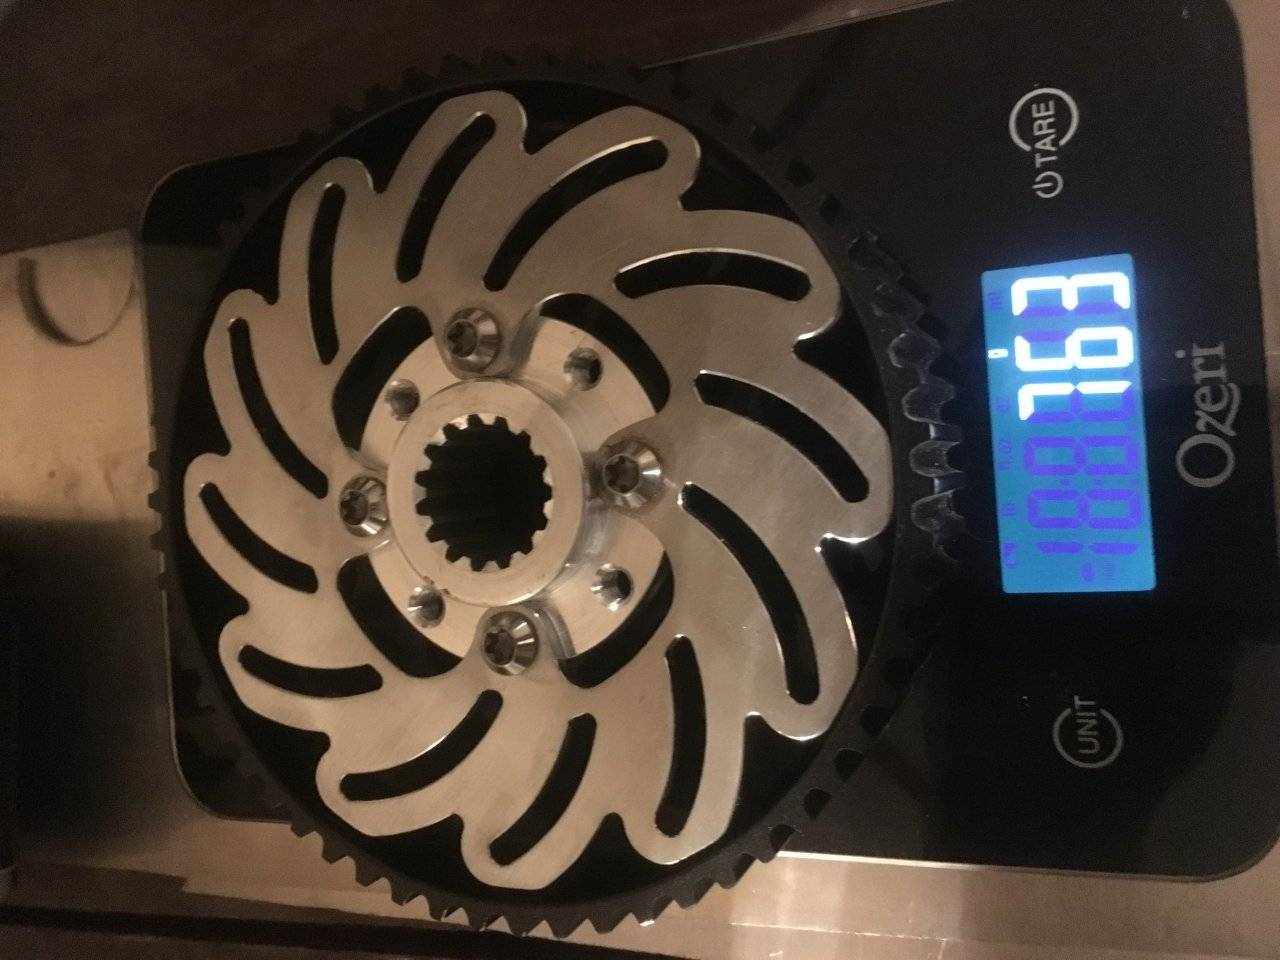
This pic shows the size of the Yeti Disk, it fits inside the C3 58 Tooth lower sprocket. This allows me to maintain symmetric protection pods for both sides of the driveshaft, as my drop and roll puts everything driveshaft related lower.
For reference here is the stock QD Disk
Stock QD Brake Disk; 835 Grams
Stock Yeti Brake with the 28mm 17 Tooth splined hubs that they used thru MY '17; 304 Grams
My re-hubbed Yeti disk (it is now a 1" 15 Tooth spline). As a note the MY '18 Yeti's should have 1" 15 Tooth hubs from a brief conversation with Kevin. The 1" 15 Tooth hub I machined from some old aluminum triple roller chain gears and used some Titanium Bolts; 315 Grams, the real MY '18 1" 15 Tooth Yeti hubs should save a few grams.
Where the brake will reside on my sleds. Under the driven clutch on the drive shaft (I've removed the plain bearing end and installed another splined end on the aluminum shaft.
My re-hubbed Yeti disk with my customized Wildwood caliper; 831 Grams, 4 Grams Lighter than the stock disk alone!
This pic shows the size of the Yeti Disk, it fits inside the C3 58 Tooth lower sprocket. This allows me to maintain symmetric protection pods for both sides of the driveshaft, as my drop and roll puts everything driveshaft related lower.
Complete Driveshaft / Brake Assembly
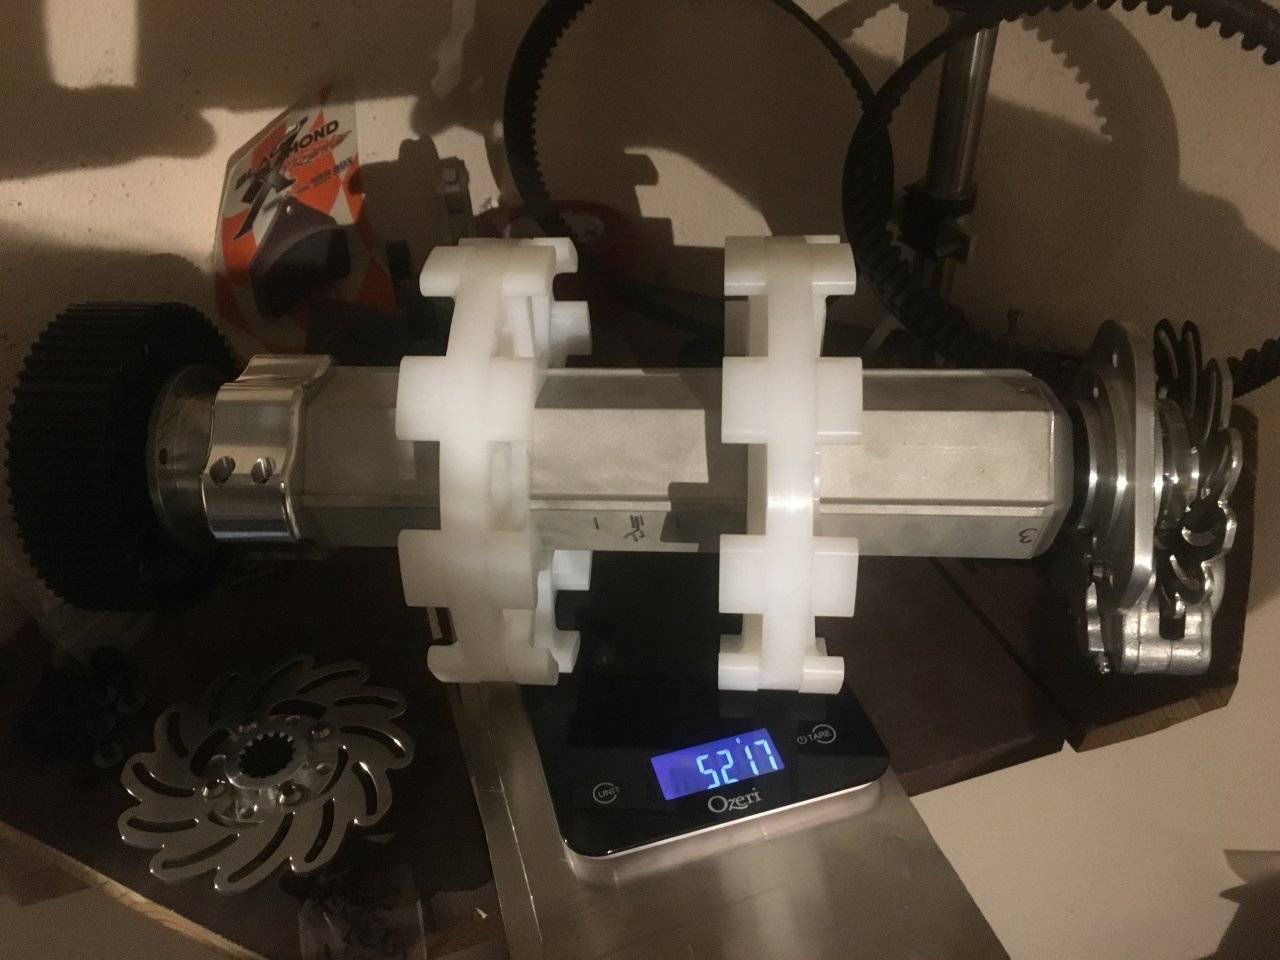
The complete drive shaft with 58 Tooth C3 sprocket, Wahl Brothers Billet aluminum flangettes, standard bearings for prototyping (it will get Ceramic Hybrid bearings when time for final installation), Happy Face Collar with fasteners upgraded to Titanium, 9 Tooth 2.86" Pitch involute drivers (custom made by C3 for me), Yeti Disk with my hub, my large flange flangette holder which also doubles as the brake mount, the P2 Wilwood caliper has been upgraded with Titanium bolts and a Titanium brake pad pin, Titanium mount bolts as well as Titanium shaft bolts, also for spacers where needed I use 1" bicycle headset spacers (usually use aluminum but are available in Titanium and Carbon fiber as well); 5217 Grams
This is with steel skidoo shaft bolt washers (these will be replaced with Titanium washers when I get around to having them water jet from some 1/4" Titanium plate I've had for 20 years), There is still some trimming / profiling to do on the brake mount, this is the first one just to visually check all clearances and dimensions in 3D, essentially to verify I was not overlooking anything in the CAD process.
S

I'm in the middle of a build similar to yours, what are you using for bearing housings? Is it something your building yourselfor where did they come from? If so would you make some for me and maybe PM price? Also curious if the bearing housing's are grease-able? I love seeing others thinking like me, my coworkers think I'm crazy for building my own sled.
I'm in the middle of a build similar to yours, what are you using for bearing housings? Is it something your building yourselfor where did they come from? If so would you make some for me and maybe PM price? Also curious if the bearing housing's are grease-able? I love seeing others thinking like me, my coworkers think I'm crazy for building my own sled.
As described in the driveshaft photo description, I'm using the Wahl Broz Billet Aluminum Bearing flangettes. From memory they are $35 Each. For the Jack Shaft I used the round ones so there was enough meat left in the flange to alter the bolt pattern to fit. For the Drive Shaft I used the lighter triangular style as the symmetrical bolt pattern works fine there.
Ideally an Aluminum Bearing flange with the flange centered or nearly so would be ideal, but with a few thick shims under each of them the Wahl's work.
Do you have the link for Lightech for the bolts, you got from them? I searched and get sport bike parts they have bolts and stuff, I assume there is a different site. Nice build I like all the light weight parts and detail. Thanks
Do you have the link for Lightech for the bolts, you got from them? I searched and get sport bike parts they have bolts and stuff, I assume there is a different site. Nice build I like all the light weight parts and detail. Thanks
I have not used any of the Lightech stuff. That was SNWMBL; I thought he had posted a link, but it is not there anymore?
There are other lost links and errors as well but with the time limit on the EDIT function it is very frustrating that I can not fix them.
I'm in the middle of a build similar to yours, what are you using for bearing housings? Is it something your building yourselfor where did they come from? If so would you make some for me and maybe PM price? Also curious if the bearing housing's are grease-able? I love seeing others thinking like me, my coworkers think I'm crazy for building my own sled.
Sledtrash
I have a few of these from a prototype build that I will not be using and would be willing to sell them. I started out with a set of the whal bro ones that are the same as what loud handle is using but went with my own design instead. These will take a seal on one side that will allow grease to be feed to the bearing. My second version will mount with studs and the retaining ring was eliminated so I could get the bearing inboard farther. The bulkhead will now do what the retaining ring was doing before. There are more details in my build thread to see how these were going to be used and details on the newer design. If anything else it may give you some ideas for your own design. Greasing was something I wanted to be able to do and I have been able to provide for it on both drive shaft bearings and on the belt drive side of the jack shaft. Please feel free to PM me for more info or details.
You are not alone on the crazy thing of building your own there are at least two more of us that are with you.
Loud Handle. Your build is looking good. I would like to see some more details on the pro shaft with two splined ends on it. Did you just glue in a stock one or did you make one up for the other end. How did this come out as far as running true I have been checking a few stock shafts including hydro formed ones and I would have expected them to run a little better that they are. The fixed bearing and shimming to no side load on a custom build just makes things more challenging compared to the old days of installing the drive shaft, locking down the drive pulley to the shaft bearing, tightening the front skid cross shaft, and then locking the lock collar on the drive shaft bearing to wherever it ends up.


Last edited:
LoudHandle. Your build is looking good. I would like to see some more details on the pro shaft with two splined ends on it. Did you just glue in a stock one or did you make one up for the other end. How did this come out as far as running true?.............
Bush,
I pirate the extra splined end from other shafts (I try to get ahold of ones where the plain end wore out prematurely, but it seems I have not had much luck). It is pretty easy to un-assemble the shaft, clean the glue groove out, prep them for new glue, press the stub in, true them if needed, inject the glue and let them cure. The ones I made to date are within a thousandth. So pretty good. A couple that I checked before disassembly were as much as 3 thousandths out.
S
Thanks!!
Sorry I was spead reading your post and didn't catch that!!
As described in the driveshaft photo description, I'm using the Wahl Broz Billet Aluminum Bearing flangettes. From memory they are $35 Each. For the Jack Shaft I used the round ones so there was enough meat left in the flange to alter the bolt pattern to fit. For the Drive Shaft I used the lighter triangular style as the symmetrical bolt pattern works fine there.
Ideally an Aluminum Bearing flange with the flange centered or nearly so would be ideal, but with a few thick shims under each of them the Wahl's work.
Sorry I was spead reading your post and didn't catch that!!
Bush,
I pirate the extra splined end from other shafts (I try to get ahold of ones where the plain end wore out prematurely, but it seems I have not had much luck). It is pretty easy to un-assemble the shaft, clean the glue groove out, prep them for new glue, press the stub in, true them if needed, inject the glue and let them cure. The ones I made to date are within a thousandth. So pretty good. A couple that I checked before disassembly were as much as 3 thousandths out.
I was thinking that the glue was applied and then the pieces were pressed together and would think trying to true it up before the glue sets up would be a challenge. So is it correct that the end is a press fit and the glue just keeps it there once it is assembled. It is awesome what that glue is capable of.
I was thinking that the glue was applied and then the pieces were pressed together and would think trying to true it up before the glue sets up would be a challenge. So is it correct that the end is a press fit and the glue just keeps it there once it is assembled. It is awesome what that glue is capable of.
I do not know of anyone using the apply and then assemble method on sleds. There are some sign companies and other industries that use that method. We used that method at work here to put some 1" Diameter UHMW trim / softner on an Aluminum fish cleaning table (we split the 1" about half way in the table saw, applied the glue to the groove and clamped it on the aluminum edge). Two seasons of longline abuse here in Alaska and close to a million pounds of fish across the table.
All of the Polaris glued parts have a glue groove in one of the mating parts and the glue is Injected / Forced thru a fill hole and out thru a vent (think, grease gun, greasing a bearing, the grease starts at the zirk and spreads outwards to where ever it can). The press fit varies due to manufacturing tolerances, but yes that is the intent with the drive shaft. Most of the other joints are slip fit and positioned with a rivet prior to injection (I assume they also have fixtures at the factory / Vendor for the glue injection step).
You have about 5 minutes to re-verify true before the glue starts to kick (There are longer working time formulations if you need more time). None of mine moved while injecting. FWIW
Curious why you didn't just do a cmx drive? I bet your close to the same price. And I see a bunch of weight I could have taken off one of mine but didn't.
Curious why you didn't just do a cmx drive? I bet your close to the same price. And I see a bunch of weight I could have taken off one of mine but didn't.
The Major reason is; His lowest gear ratio is still too high. IMO
Secondly; While he drops and rolls it some, it is still too close together to fit a grownup sized driver (9 Tooth) and run a real paddle at the same time and have any snow evacuation clearance.
Third; Too Heavy.
Fourth; Too Expensive.
Fifth; I've never been one to take the easy way out. I'm not a joiner, nor do not follow anyone or anything. I'm a Intellectual Rebel and I like doing things my way.
I have many subtitle changes to document yet. Among them are raising the tunnel ceiling, re-doing the rear over structure geometry and re-tubing it in TI, braking a flange on the stock extruded running boards to narrow and stiffen them, eliminating the fragile cast running board ends, mounting the extruded running board further forward, Cooler build, TI front bumper, TI bulkhead cross link, TI Spindles, etc.
Similar threads
F
- Replies
- 8
- Views
- 750
F
B
- Replies
- 2
- Views
- 939
J
- Replies
- 7
- Views
- 846
D
- Replies
- 1
- Views
- 837
C
- Replies
- 24
- Views
- 5K