• Don't miss out on all the fun! Register on our forums to post and have added features! Membership levels include a FREE membership tier.

Install and Review: Superclamp Superglides II Pro

christopher

Well-known member
Staff member
Lifetime Membership
Nov 1, 2008
81,512
27,373
113
Rigby, Idaho
Before I dive into this Install and Review I think it's important to give some background on my personal relationship to this product.

When I first got into sledding I purchased a simple 18ft cargo trailer with wood floor and ramp.
This configuration lasted a couple rides before it became obvious it wasn't going to last.

Thinking I was smart I added a full roll out ribbed heavy plastic floor covering to protect the wood from the snow and water.
The cover did its job great in protecting the floor, but when it was WET or had Snow/Ice on it, it became the ultimate SLIP and SLIDE.
And getting the sleds up and down a bare wood ramp was still an enormous PITA!.

After a year of using that mat, I removed it, sprayed the floor with a water sealant and installed a set of "Smooth" plastic glides to protect the wood.
This combination worked pretty well and lasted me another 2 seasons.
BUT.
These plastic glides were SMOOTH, so I still had a HORRIBLE problem with my wife or kids stepping on the glides when there was snow or ice on them and playing the SLIP & SLIDE game.
After your wife and kids each biff it a few times you quickly realize that your trailer is NOT endearing itself to the family.
And as the old saying goes, "When momma ain't happy, ain't nobody happy".

Jump to the Fall of 2013 and my first SnoWest Project Trailer.
http://www.snowest.com/forum/showthread.php?t=353312

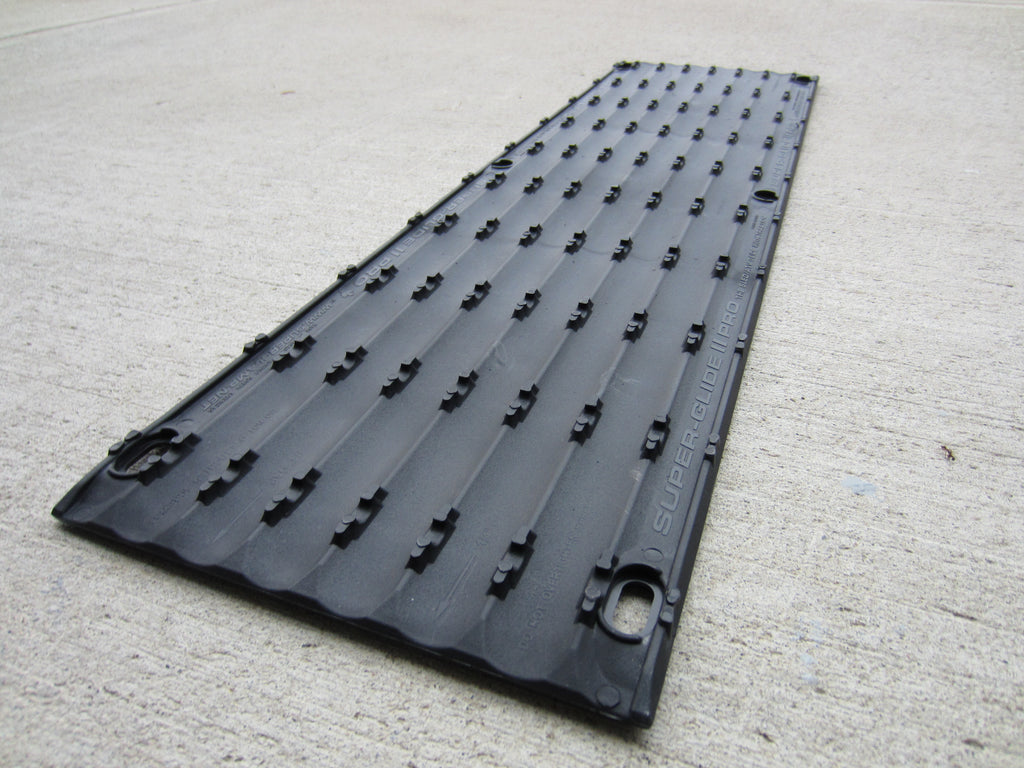
In this trailer I made a point of ordering a full set of the Superclamp Superglides II Pro installed from Mirage while the trailer was being manufactured.
You can see that from around post 374 on and then again at post 429 on.
The difference these glides made simply can not be over stated.
It was DAY and NIGHT for the people in the trailer.!!

When it was finished, this is what I got.
2 sets of tracks on the inside.
picture.php


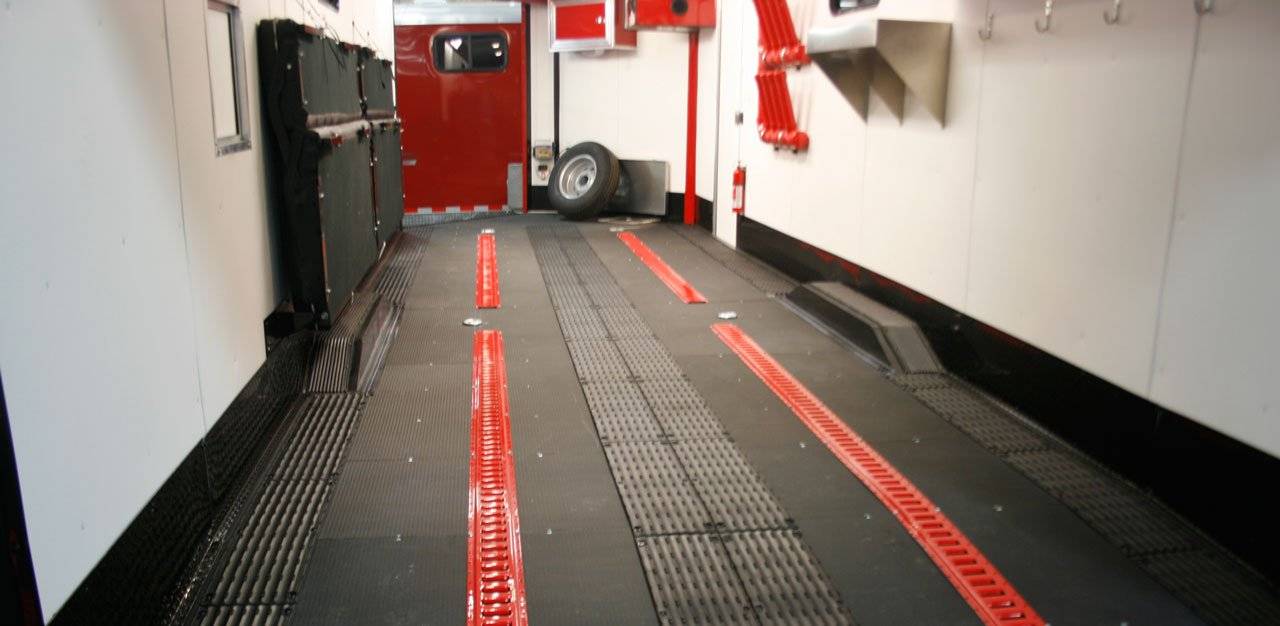
And full coverage on the front and rear ramps.
e7aqeqeh.jpg


I had the delight of being able to use this trailer every weekend this last season and I can honestly say that EVERYONE who stepped foot inside of this trailer loved these glides!
No matter how much Snow or Ice was on them, when you stepped on them you were absolutely SURE FOOTED.
And when driving the sleds in or out of the trailer there was NO slippage or skidding.
The sleds were steerable and went exactly where you wanted them to go.

Most every weekend this is what the trailer looks like with 4-5 sleds packed in
ju9e9ase.jpg


Jump ahead to the late summer of 2014.
After enjoying my brand new trailer I sent in a rather long detailed report with all of my thoughts about it to Mirage.
Much to my surprise they wrote back asking me to sell the new trailer and allow them to build me another project trailer, one that would address all of my comments on the first.
(Build a MORE perfect Trailer) http://www.snowest.com/forum/showthread.php?t=378363


This time around I opted not to have Mirage do the Superglides install, but rather to do it myself so that I would have this opportunity to write about them for everyone on SnoWest.
And so this weekend I finally got started on the process of doing that installation and writing this review.
This install will be done in 3 separate phases.
Rear ramp (done), center section (Next), front ramp (Last).


While this review is going to be an unabashed endorsement for these glides, I do want everyone to know that they were NOT donated or sponsored by Superclamp for this project.
Just like you, I wrote the check and bought them with my own hard earned money.
I liked them so much on the first trailer, I wouldn't even consider having another trailer with out them!

I ABSOLUTELY LOVE THESE GLIDES!
 
Last edited:

christopher

Well-known member
Staff member
Lifetime Membership
Nov 1, 2008
81,512
27,373
113
Rigby, Idaho
Here is all of the pertinent company contact information I clipped from their web site.

topCell_D2.jpg


BOX_CSERVICE.jpg


glide6.jpg


Superglide_II_Pro_004_1024x1024.jpg


MAINSCROLLER__SUPERGLIDES-Text.png


Superglides II PRO $114.95 CDN MSRP
Superglides allow your snowombile to slide while still providing traction for your ATV as well as for you when climbing up or down your truck deck ramps or trailer.

Scroll over the hot-spots above for full feature listing and benefits, view photos and videos below, visit our dealer locator to find a dealer near you, or shop online with Superclamp to get yours today!
If you have any questions about Superclamp and our products, please call us at 1-403-203-2210.

http://superclamp.net/superglides.asp

FSHEETBG__SGLIDES.png
 
Last edited:

christopher

Well-known member
Staff member
Lifetime Membership
Nov 1, 2008
81,512
27,373
113
Rigby, Idaho
Here are some Company Promotional Videos I downloaded from their You-Tube site.

How they are made

<iframe src="//www.youtube.com/embed/gHpnUWJzmgs" allowfullscreen="" frameborder="0" height="480" width="853"></iframe>


How they work
<iframe src="//www.youtube.com/embed/ms4-VMkcGdk" allowfullscreen="" frameborder="0" height="480" width="640"></iframe>


How they are Installed
<iframe src="//www.youtube.com/embed/wO41pQ50_f0" allowfullscreen="" frameborder="0" height="480" width="640"></iframe>
 

christopher

Well-known member
Staff member
Lifetime Membership
Nov 1, 2008
81,512
27,373
113
Rigby, Idaho
NOTE.
All of these photos were shot as simple Snap-Shots on my iPhone.
Everything you see is raw right from the camera and not manipulated in any way..


When I did the estimation with Superclamps we determined I was going to need a fair number of glides!
u6adureb.jpg


picture.php


All of the instructions are printed right on the flap of every box.
Nice and big and clear so there is absolutely NO mistaking how to do the install.

attachment.php


attachment.php


attachment.php


attachment.php


picture.php


NOTE.
If the following photos appear SMALL on your browser, just click on them to zoom.
They were uploaded from my phone to Snowest using TapaTalk and sometimes the display gets a little odd


Backed the trailer right up the edge of my garage.
ImageUploadedByTapatalk1418624506.612250.jpg

Droped the rear ramp and back it inside and tried to block off some of the cold air to keep the garage a little bit warmer than the blowing snow outisde.
ImageUploadedByTapatalk1418624521.744990.jpg

The trailer came with some really basic traction blocks for driving up the ramp or backing down.
At best they just barely get the job done.
A trailer as nice as this really deserves the best in floor traction.
ImageUploadedByTapatalk1418624537.027866.jpg

Unscrewed all of the traction blocks revealing just the bare Polybead floor and LOTS of visible carbide cuts from trips we have already made this season.

ImageUploadedByTapatalk1418624551.177889.jpg

ImageUploadedByTapatalk1418624563.361878.jpg
 
Last edited:

christopher

Well-known member
Staff member
Lifetime Membership
Nov 1, 2008
81,512
27,373
113
Rigby, Idaho
First thing I did was to crack open several boxes of Superglides and lay a bunch of them out across the ramp just to get a quick sense of size and spacing.
In a few seconds we determined that 10 was going to be the right number to cover the rear ramp from side to side.
I used a small piece of wood to push the glides in from the edge a bit and to keep a nice straight line.
Then used a large T-Square to keep them all perfectly flat with one another as we moved from side to side.

ImageUploadedByTapatalk1418624993.861145.jpg

ImageUploadedByTapatalk1418625009.177801.jpg

ImageUploadedByTapatalk1418625023.561979.jpg

ImageUploadedByTapatalk1418625039.311035.jpg

ImageUploadedByTapatalk1418625060.661218.jpg

ImageUploadedByTapatalk1418625075.877876.jpg
 
Last edited:

christopher

Well-known member
Staff member
Lifetime Membership
Nov 1, 2008
81,512
27,373
113
Rigby, Idaho
I WOULD strongly suggest you start at the TOP of your ramp and work your way down.
Starting at the bottom and going up means your knees have to be ON the glides as you crawl up.
Not pleasant!

ImageUploadedByTapatalk1418627303.897345.jpg

ImageUploadedByTapatalk1418627340.166116.jpg

ImageUploadedByTapatalk1418627369.297906.jpg

Another item that DID come in really handy was this 1/4" dowl.
It was just the right length and width to use to separate each of the glides from the other.
Aimed for 1/4inch from top to bottom and about a half an inch from side to side so that spacing from left to right would be more or less equal all across the ramp.

ImageUploadedByTapatalk1418627399.446505.jpg

ImageUploadedByTapatalk1418627419.130378.jpg

ImageUploadedByTapatalk1418627437.930386.jpg

ImageUploadedByTapatalk1418627487.013463.jpg
 
Last edited:

christopher

Well-known member
Staff member
Lifetime Membership
Nov 1, 2008
81,512
27,373
113
Rigby, Idaho
Trimming the 3rd row of glides to fit exactly to the length of the trailer ramp couldn't have been any easier.
Just used a simple Jig-Saw and it sliced through them like warm butter!

ImageUploadedByTapatalk1418627626.165916.jpg

ImageUploadedByTapatalk1418627641.496013.jpg

ImageUploadedByTapatalk1418627651.463989.jpg
 
Last edited:

christopher

Well-known member
Staff member
Lifetime Membership
Nov 1, 2008
81,512
27,373
113
Rigby, Idaho
Part of this install also included a set of Edge Guides for the ramp.
While these are not absolutely necessary, its a nice touch and will certainly keep the edge of the trailer ramp in MUCH better condition over the years as the carbides don't cut into it.

ImageUploadedByTapatalk1418627842.830824.jpg

ImageUploadedByTapatalk1418627863.779791.jpg

ImageUploadedByTapatalk1418627874.264087.jpg

ImageUploadedByTapatalk1418627889.631046.jpg

ImageUploadedByTapatalk1418627899.798123.jpg
 
Last edited:

christopher

Well-known member
Staff member
Lifetime Membership
Nov 1, 2008
81,512
27,373
113
Rigby, Idaho
All in all, this portion of the install was FAST and EASY.
I would guess we spent about 3 hours total doing this ramp.

The guys at Mirage told me it took them 10 total man hours to do the whole trailer last year. And I would say that is probably about right.

My son and I could easily have increased our speed, but it was a saturday afternoon, the music was playing, the snow was falling, we had a nice lunch, and there was just no rush at all.

Super happy with the final outcome and hope to get the track laid in the trailer itself next.


One MAJOR CHANGE this year for the trailer portion will be the inclusion of Superclamps new EDGE RAIL TRIM. This is something I did NOT try last time around but I wanted to test out this time.

At this point the jury is out on this.
Honestly don't have any idea if I will love it or hate and just not care.
But I will know soon enough!:face-icon-small-hap

P1040401-scaled.jpg


P1040402-scaled.jpg


P1040403-scaled.jpg


P1040404-scaled.jpg
 

SRXSRULE

Well-known member
Lifetime Membership
Aug 25, 2002
2,512
1,592
113
Superglides are a great product, I have them on my sled deck with the aluminum mounting extrusions. Works great, I can walk right up the steep ramp with snow on the ramp and my boots and no slipping.

I do have a question about installing the guides on the trailer flooring itself. The ramps for sure need it for traction but your floor is poly-bead, that stuff is pretty darn good. I would think the guides on the floor would actually get in the way when hauling 5/6 sleds in there? plus the guides go up and over the wheel wells but it looks like the fold down benches are in the way to allow the ski to go past while staying on the guide. thought? Eric
 
C

Covelli44

Well-known member
Jan 2, 2011
595
178
43
39
North Aurora, IL
Curious as to why you covered the entire ramp? I'm sure it helps with traction, but is there another reason I am missing? That is a lot of cash in one spot
 

christopher

Well-known member
Staff member
Lifetime Membership
Nov 1, 2008
81,512
27,373
113
Rigby, Idaho
Superglides are a great product, I have them on my sled deck with the aluminum mounting extrusions. Works great, I can walk right up the steep ramp with snow on the ramp and my boots and no slipping.

I do have a question about installing the guides on the trailer flooring itself. The ramps for sure need it for traction but your floor is poly-bead, that stuff is pretty darn good. I would think the guides on the floor would actually get in the way when hauling 5/6 sleds in there? plus the guides go up and over the wheel wells but it looks like the fold down benches are in the way to allow the ski to go past while staying on the guide. thought? Eric

So.
Mirage ships the trailer with some generic guides already attached to the wheel fenders.

Guessing that the trailer benches are identical to last year..
That means there is EXACTLY enough room for a ski to fit underneath the bench on the glide that goes over the wheel fender. There wasn't an inch to spare! But they did fit every time with no damage to the bench.

As for the glides and the floor.
We spent 4-5 days at Tog last year, and had some SERIOUS ice buildup on the floor. Those glides absolutely SAVE OUT BUTT multiple times from some NASTY slips on the floor ice! They also make driving the sleds much easier, without them you can turn the skis and the sled just skids on the PolyBead floor as it is SO slippery.
 

christopher

Well-known member
Staff member
Lifetime Membership
Nov 1, 2008
81,512
27,373
113
Rigby, Idaho
Curious as to why you covered the entire ramp? I'm sure it helps with traction, but is there another reason I am missing? That is a lot of cash in one spot

By covering the entire ramp I can run ANY vehicle in or out of it.
Dirtbike
Snowbike
Quad
Sled
Motorcycle
ATV
ect.

Full coverage means there is ZERO possibility of slippage.

And, for my kids, I just was NOT willing to have any more falls and crash landings on an icy ramp.

One really good slip where your wife goes CRASHING DOWN hard ruins the whole trip!:face-icon-small-win Those glides were CHEAP by comparison to the grief they removed from my life!!:face-icon-small-hap:face-icon-small-hap:face-icon-small-hap
 

christopher

Well-known member
Staff member
Lifetime Membership
Nov 1, 2008
81,512
27,373
113
Rigby, Idaho
Phase 2, installing the floor.

Unpacking the edge trim
picture.php


Holding two pieces of the edge trim, we slid the SuperGlides into them.
picture.php


picture.php


picture.php


And preassembled all of them this way into a nice stack to be used later.
picture.php
 
Last edited:
Premium Features