• Don't miss out on all the fun! Register on our forums to post and have added features! Membership levels include a FREE membership tier.

Pro 800 top end rebuild

Thread Rating
5.00 star(s)
R

rmscustom

Well-known member
Jun 8, 2010
2,181
1,801
113
I have a couple of ? did you check for cracked skirts , did you check bore and out of roundness , check ring end gap ,who honed your cylinders and what type of hone and what grit did you use and how did you clean up the cylinder when done.
Did you check bottom base gasket to make sure none of it stuck out into the ports same with exhaust gaskets?

I checked my bore size and it was perfect above the exhaust port and .0003'' bigger at the bottom of the cylinder. Set ring gap to specs and me and the bro in law honed the cylinders (3 stone hone not sure on grit). Then it got a hot soapy bath in the kitchen sink, rinsed, dried and wiped out cylinders with a clean rag and 2 stroke oil until clean.

ps Stock pistons with 1300 miles had .008" clearance and rings were flaked badly running about a 35:1 oil ratio last year. MY13.
 
D

Danbot

Well-known member
Nov 29, 2007
1,696
967
113
Alberta, Canada
I don't have the proper tools, so I had a shop I trust inspect, measure, and hone my cyls for me. They used a rigid hone. My ring end gap was a little tight and needed to be adjusted as well.
 

beamslayer

Well-known member
Premium Member
Nov 29, 2007
944
314
63
65
Try ATF when cleaning cylinders after washing with simple green and hot hot water . Put atf on a white rag and wipe out until rag stays red .
Cylinder should be honed with a aluminum oxide hone I believe 240 grit and I use a 3 stone hone .
 
I
Oct 25, 2008
19
2
3
Are you guys honing the cylinders to just put the cross hatch scratches on the walls or are you going further and getting them replated?
I have a kit coming and it is going on a motor with only 750 miles on it.
T
 
S

SU27

Well-known member
May 4, 2013
206
70
28
Edmonton
Are you guys honing the cylinders to just put the cross hatch scratches on the walls or are you going further and getting them replated?
I have a kit coming and it is going on a motor with only 750 miles on it.
T

If cylinder's plating is in good condition, it must be only hatch scratches. if you see even a small spot of nicasil missing/worn out, even if it is below ports, just send it for re-coating with no doubts.
As well, I would go for honing with well known company or dealer - they worry for reputation and able to replace your cylinders with new one (in case of screw-up). Local machine shop can screw it up, and then never admit that fact. So I mean your personal standards of quality are inline with big guys, because they care.
 
D

Danbot

Well-known member
Nov 29, 2007
1,696
967
113
Alberta, Canada
Just an update about my fix kit.
I have burped the coolant, bled the oil pump, and have run it through several heat cycles.
My 1900 mile oem pistons tested at 101/102 psi
I just tested the fix kit and got 111/111 psi
Again this is at 4200' elevation with the same tester, both operating temperature tests.
 
D

Danbot

Well-known member
Nov 29, 2007
1,696
967
113
Alberta, Canada
I also installed a MTNTK blowhole, and Fire n Ice QD belt tensioner for this year, while not directly related to a top end rebuild... there is a convenience factor so I'll touch on the subject.

While you have the sled 1/2 apart for a top end rebuild is the perfect time to install the blowhole! To do it right, you need the console, clutch cover, oil bottle, and complete airbox out.
-The blowhole kick-plate is not easy to get in the perfect position, the more room you have the easier the work will be. I drilled out most of the rivets on the bottom of the left fender so I could flex it out of the way.
-An air powered angle drill was a blessing, I could tell a few spots would be awkward with a standard drill.
-Use clamps to sandwich the pieces while drilling / riveting.
-Your oil bottle cap is going to be buried in the side panel vent after installing the blowhole, I drilled my own holes to secure the rear of the clutch cover to the MTNTK kick plate so I could shift in inwards a little bit.
I also did their recommended "adjustment" to the clutch cover described in the instructions, and had to trim more of the vent than they said. It still turned out fine.
-I added a small power switch in the console, and an inline 2a fuse.

consoleview_zpsb3ec004e.jpg


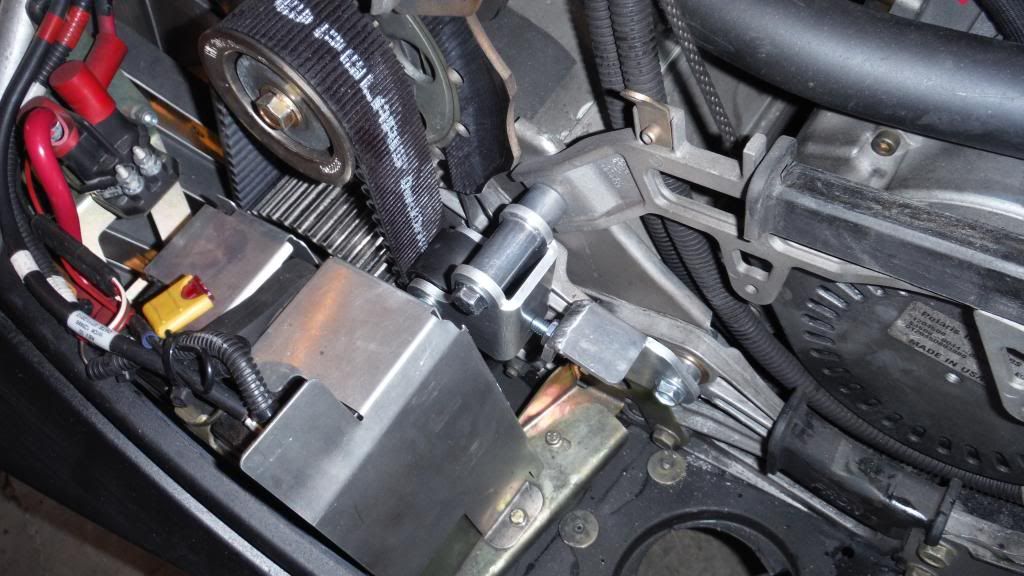
Installing the Fire n Ice QD tensioner is straight forward, good instructions.... but the three torx bolts you have to remove from your chassis are brutal! In the instructions they say that the bolts must be heated, I used a propane torch liberally, and a high quality torx bit to get them out. A cheap bit is only going to cause problems here. They cracked loosed HARD, and then were very stiff to turn out. I didn't pull any threads, but I can see it being a good possibility. There is just more room to deal with this nightmare with the console and exhaust system out of the way.
-If you have e-start like me, you will need to trim a small piece of the back of the tin battery cover so the tensioner doesn't rub / vibrate against it.

DSCF0279_zps7a91bb7f.jpg


And with that... I am done and ready for snow, lets get this s%$# started!
 
Z
Feb 3, 2013
2
0
1
Correct me if I'm wrong but i was under the assumption that you should never hone a cylinders that has a nicasil coating??
 
0
Oct 18, 2009
9
3
3
MA/NH
Did anyone have trouble finding the green o-rings? I can't find any green o-rings on my injectors. I looked in the cylinders and in the case... The only o-rings i found were still on the injectors when I pulled them out and they are brown/black...
 
D

Danbot

Well-known member
Nov 29, 2007
1,696
967
113
Alberta, Canada
Did anyone have trouble finding the green o-rings? I can't find any green o-rings on my injectors. I looked in the cylinders and in the case... The only o-rings i found were still on the injectors when I pulled them out and they are brown/black...

Mine stayed in the injector ports when I removed the injectors.
 

Dartos

Well-known member
Lifetime Membership
Sep 6, 2001
1,574
668
113
Craig, CO
I also installed a MTNTK blowhole, and Fire n Ice QD belt tensioner for this year, while not directly related to a top end rebuild... there is a convenience factor so I'll touch on the subject.

While you have the sled 1/2 apart for a top end rebuild is the perfect time to install the blowhole! To do it right, you need the console, clutch cover, oil bottle, and complete airbox out.
-The blowhole kick-plate is not easy to get in the perfect position, the more room you have the easier the work will be. I drilled out most of the rivets on the bottom of the left fender so I could flex it out of the way.
-An air powered angle drill was a blessing, I could tell a few spots would be awkward with a standard drill.
-Use clamps to sandwich the pieces while drilling / riveting.
-Your oil bottle cap is going to be buried in the side panel vent after installing the blowhole, I drilled my own holes to secure the rear of the clutch cover to the MTNTK kick plate so I could shift in inwards a little bit.
I also did their recommended "adjustment" to the clutch cover described in the instructions, and had to trim more of the vent than they said. It still turned out fine.
-I added a small power switch in the console, and an inline 2a fuse.


I just installed a Blow Hole this weekend. I was completely underwhelmed with the fit of the kit. As you did on yours, I also had to redrill the clutch cover holes in an attempt to get the side panel to close and fit properly. The side panel WILL NOT close properly, it stuck out about 1/2 inch before I started trimming. With the vent completely removed the side panel still hit the oil cap before the panel could close and fasten the rear Dzus fastener.

In my opinion the kit is very good quality but the new kick panel assembly needs a lot of trimming to get the side panel to fit flush on the console.
 
D

Danbot

Well-known member
Nov 29, 2007
1,696
967
113
Alberta, Canada
I just installed a Blow Hole this weekend. I was completely underwhelmed with the fit of the kit. As you did on yours, I also had to redrill the clutch cover holes in an attempt to get the side panel to close and fit properly. The side panel WILL NOT close properly, it stuck out about 1/2 inch before I started trimming. With the vent completely removed the side panel still hit the oil cap before the panel could close and fasten the rear Dzus fastener.

In my opinion the kit is very good quality but the new kick panel assembly needs a lot of trimming to get the side panel to fit flush on the console.
I agree, it is not simple "bolt on" installation. There is a little art to jobs like this for sure. In hindsight... I would have spent more time double checking fit before riveting, difficult to do with the interfering parts removed (oil bottle, clutch plate, etc). Overall, I am happy with how it all fits together now. I think I got lucky with the position of my oil cap when it's screwed on lol
 
0
Oct 18, 2009
9
3
3
MA/NH
I made sure to double check the injector port and do not see a green o-ring anywhere. Just a black one and a brown one. Did some injectors have a black o-ring instead of green, anyone know?? This is in a 2011 if it makes a difference. Thanks
 
Last edited:

lucasMX358

Active member
Lifetime Membership
Feb 28, 2009
169
33
28
40
Dickinson, ND
I am also interested in the cyclinders, i have 291 miles on MY13, do i still need to hone? i'm going to be installing RK TECH drop in and head kit? (SUPRISE FOR THE GUY WHEN WE HIT THE SNOW) First time i've stepped into the realm of this type of mod (boondocker fuel controller) and help/suggestions would be great.
 
R

rmscustom

Well-known member
Jun 8, 2010
2,181
1,801
113
I am also interested in the cyclinders, i have 291 miles on MY13, do i still need to hone? i'm going to be installing RK TECH drop in and head kit? (SUPRISE FOR THE GUY WHEN WE HIT THE SNOW) First time i've stepped into the realm of this type of mod (boondocker fuel controller) and help/suggestions would be great.

Yes, hone.
 
T

Trenchmaster

Well-known member
Nov 26, 2007
960
162
43
Edmonton, Alberta
I made sure to double check the injector port and do not see a green o-ring anywhere. Just a black one and a brown one. Did some injectors have a black o-ring instead of green, anyone know?? This is in a 2011 if it makes a difference. Thanks


The injectors were changed for the 2012 model the injectors on the 2011 have 3 "O" rings that stay on the injector when you pull them out, should be replaced before re-install.
 
Premium Features