• Don't miss out on all the fun! Register on our forums to post and have added features! Membership levels include a FREE membership tier.

Visi's Mod Shop

Visi

Well-known member
Lifetime Membership
Nov 26, 2007
884
189
43
36
Paradise, CA
Grip 'N Rip chassis braces.

AD7E5C2C-571D-40FC-B2AC-0BFB6467F466-174-000000B69EAC4DDF.jpg


Used the Grip 'N Rip bolt location and drilled another hole for the oil pump. Used washers to make up the thickness for the braces.

C2BB0E58-C801-4F22-A317-2AF112DA118C-174-000000B6A46A0199.jpg


Clearance between oil pump and the recoil.

986325E4-ED42-4163-AF49-F92621C755C3-174-000000B6AC165B54.jpg
 
Last edited:

Visi

Well-known member
Lifetime Membership
Nov 26, 2007
884
189
43
36
Paradise, CA
Got the turbo reeds installed. I am going to try these and have a set of doubled up stock reeds ready when I need to change them out.

88D3F44A-D0CF-4B54-97F7-6EDFE6AB4A6B-2110-0000032884E6575C_zps8f858644.jpg


I cut the flange off the stock can so I could build my own exhaust from the pipe to the turbo.

2794931D-8F3C-4673-B7FB-91D3C1EEEA46-2110-000003288D603C0C_zps34799d46.jpg


This is all I needed.

83EC2A13-E30B-47F8-B66C-E211BA89356A-2110-000003289A9CA783_zpsa5e8de50.jpg
 
Last edited:

Visi

Well-known member
Lifetime Membership
Nov 26, 2007
884
189
43
36
Paradise, CA
I built the exhaust. I had to lengthen the Turbo Boyz oil tanks neck because of the .70 AR compressor housing. I don't know if I've mentioned what turbo I'm running. It's a Gt3071r with tial .63 AR turbine housing and a .70 AR compressor housing. I will be running a Tial 38 mm MV-S wastegate.

0C7375D3-AB7B-4468-9707-6D8C61E22836-2110-000003263DDD709A_zps49ce86c6.jpg


47C47AC0-DE87-4CE2-AD84-2323FB5FF7AC-2110-0000032646443CC9_zps6e94b9b7.jpg


0D97E3D5-A0EF-4683-A164-F7EBF7A885BB-2110-000003264C4C7ABE_zpsca480c42.jpg


I will smooth the welds out this week. I am going to run split flanges on each side of the pipe. I plan on welding on a flat piece of plate on the base of the exhaust to help hold and stabilize the turbo better but I need to find a scrap somewhere.
 

Wheel House Motorsports

Well-known member
Lifetime Membership
Nov 27, 2007
29,933
5,968
113
34
SW MT
not to be a downer.. but mild steel pre turbo is bad news... all 16gauge SS or your gonna have issues with cracking things through the winter. the DP looks slick. gonna sound NICE. if you get the wastegate pipe Y'd out of the pre turbo pipe thats gonna be a nice short run into the DP.. clean and simple!
 

Visi

Well-known member
Lifetime Membership
Nov 26, 2007
884
189
43
36
Paradise, CA
Damn, thanks for the heads up. I don't have trimix gas. Will that screw me up besides a little rust?
 

Visi

Well-known member
Lifetime Membership
Nov 26, 2007
884
189
43
36
Paradise, CA
we just use straight argon with stainless rod and dont have issues? thats all we run on everything with our tig welder.

Good to know. I don't have a tig yet. I'll have to get a little wire and tri mix from my buddy's welding shop. Luckily he wants to borrow my camera for a school project.
 

brycter

Well-known member
Lifetime Membership
Nov 26, 2007
1,537
706
113
West Haven, Utah
www.turboboys.net
I have a 583 rotax that has a mild steel inlet pipe never had a problem. Still doing it that way and never had a problem. Two strikers don't build as mich heat as one thinks. Also if it was som much of a problem y pipes would be failing left and right.
 

Visi

Well-known member
Lifetime Membership
Nov 26, 2007
884
189
43
36
Paradise, CA
Got a few things done. Welded, drilled, and tapped my pipe for fuel regulator reference.

6E6B7A55-FE56-429E-9DBF-C1068E0E3480-1002-00000222F6F7F677.jpg


Got my reed gaskets. Got the reeds in with the Turbo Boyz reed backing plates.

9A78E4B2-6D97-4C04-B99D-6E6AAB376C2E-1002-00000222FD83A26A.jpg
 

Visi

Well-known member
Lifetime Membership
Nov 26, 2007
884
189
43
36
Paradise, CA
Got my intake manifold ready to go. Welded up the boost fittings so I can try a few things. Also cut out the Turbo Boyz 2" inlet and made a 3" inlet.

FB4B2DEB-109A-4730-85EB-851ABDC64AEF-1002-000002230EC4B481.jpg


Did a dry fit. I have to do some drilling in the carbs still but got the charge tube alignment pretty
much figured out.

84664630-BFF2-45D0-BAA0-AB38EDEA99FB-1002-00000223078F780E.jpg
 

Visi

Well-known member
Lifetime Membership
Nov 26, 2007
884
189
43
36
Paradise, CA
Thanks man. You got some cleaning or wrenching to do on sled? I'm hoping by next weekend I'll be done engine wise. I think CA will be late Nov. before we see anything.
 
Last edited:

vendetta

Active member
Lifetime Membership
Oct 12, 2008
220
40
28
45
Langley B.C
Just a word of advice. Where the boots go on the air box weld in a lip for the clamps to hit cause when they get oil on them and at boost they tend to blow off. And when that happens, well we all know what happens lol.

Rob
 

Visi

Well-known member
Lifetime Membership
Nov 26, 2007
884
189
43
36
Paradise, CA
Thanks for the advice. From the picture you can't see it but it has a lip on the carb side
 
S

swrev

Well-known member
Jun 26, 2008
952
349
63
Lewistown, MT
Thanks man. You got some cleaning or wrenching to do on sled? I'm hoping by next weekend I'll be done engine wise. I think CA will be late Nov. before we see anything.

Going to install new pistons, put on electric start (only weighed 483 w/ about three gallons of gas, so I'm not worried about weight), and work on my exhaust outlet. Otherwise just give a good cleaning and inspection.
 

Wheel House Motorsports

Well-known member
Lifetime Membership
Nov 27, 2007
29,933
5,968
113
34
SW MT
thats loooking NICE! the lip on the carb side idea is sound advice for sure..

3 charge tube is where its at.. your gonna LOVE how this thing hits.
 

Visi

Well-known member
Lifetime Membership
Nov 26, 2007
884
189
43
36
Paradise, CA
I can't wait to ride it! Thanks for the advice on the 3". Watching that poodoo you guys built with a 3" was enough to make my mind up. I'm not sure you could run a 3" on an XP without an oil delete.
 

Visi

Well-known member
Lifetime Membership
Nov 26, 2007
884
189
43
36
Paradise, CA
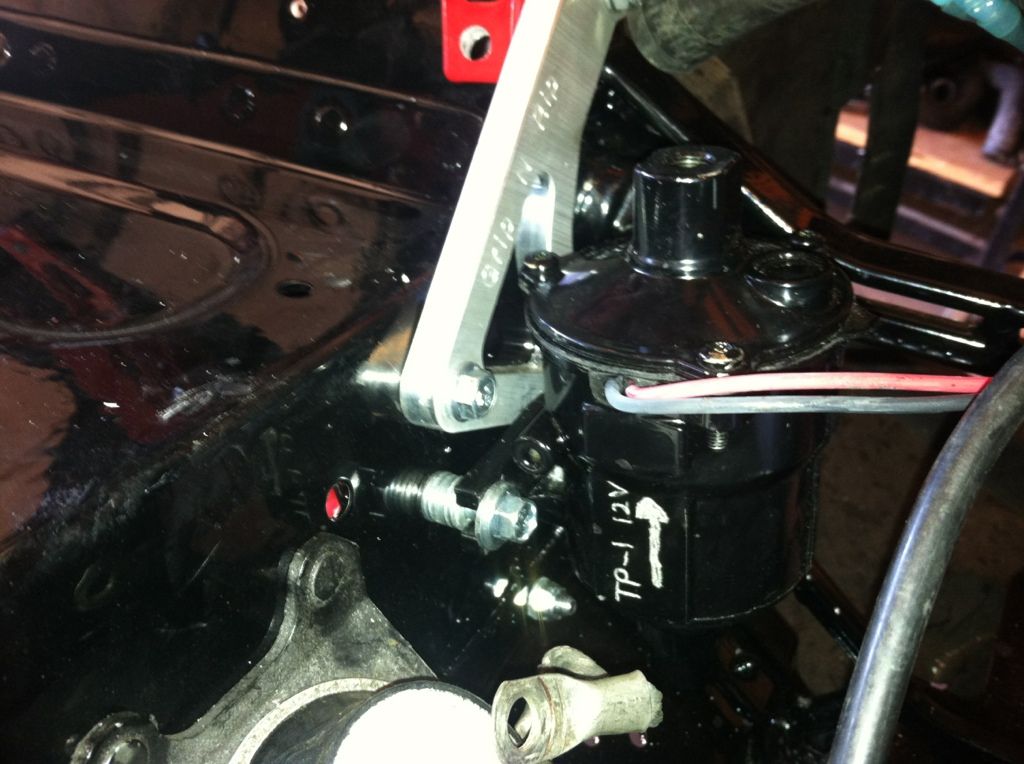
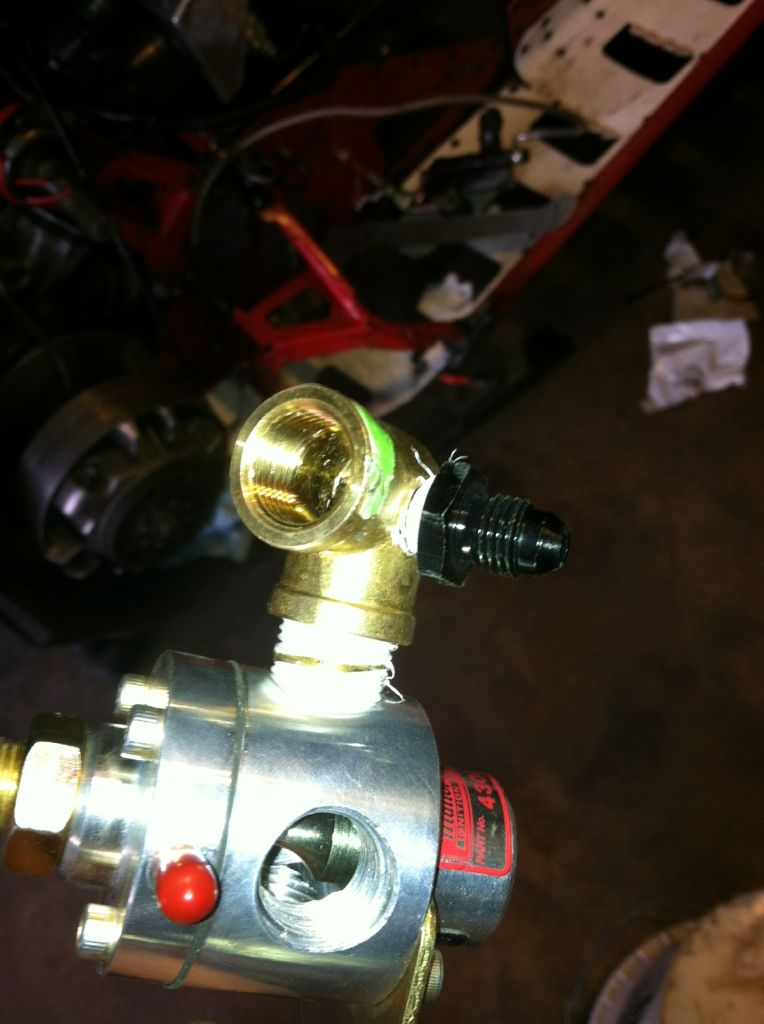
Got the fuel regulator figured out and mounted. I had a few clearance issues with the port the feeds the carbs and the fuel pressure gauge. I ended up getting a brass 3/8 close nipple, brass 3/8 elbow, and a 1/8" npt tap for a -4 AN x 1/8" npt fitting. I tapped the elbow at the bend for the -4 AN x 1/8" npt.

0671125A-8D09-48EF-8787-434E2399353F-601-0000010C34555BDA.jpg


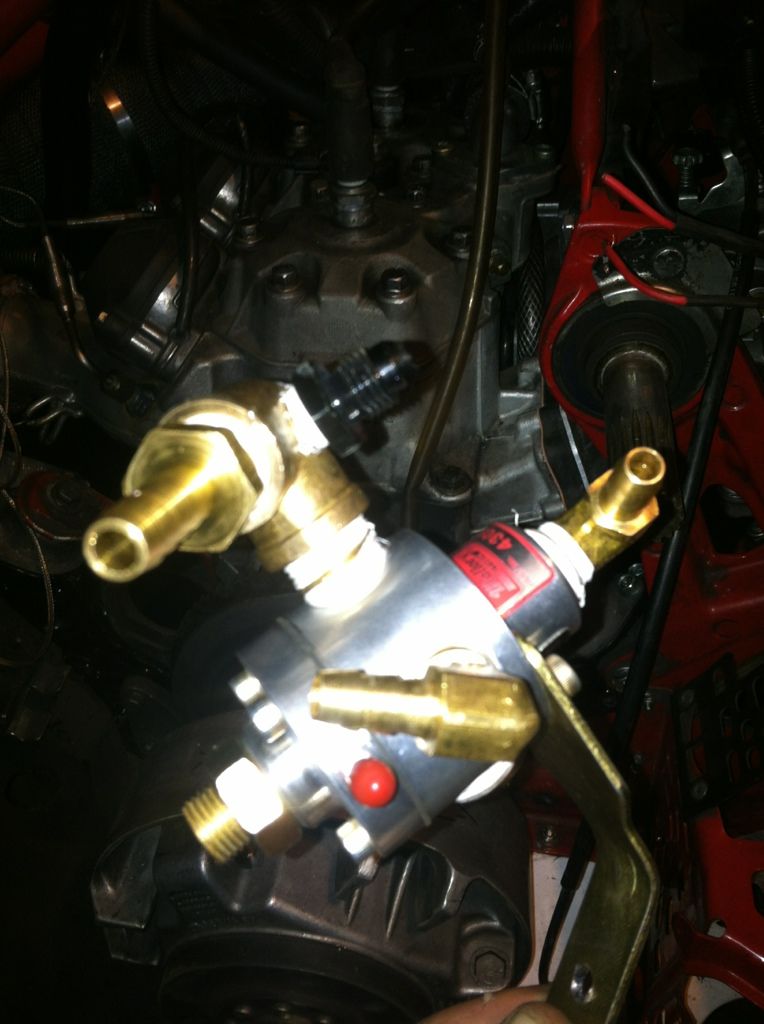
I installed the rest of the fittings. One barbed elbow will be the fuel pressure regulator feed from the new fuel pump and the other barbed elbow will take extra fuel that's not used back to the fuel tank. Where the red cap is on the regulator that is where the pressure feed from the pipe will go. I am pulling pressure from the pipe instead of the intake manifold because even at idle the pipe will have a pressure. The intake manifold won't have a charge until there is boost in the system.

A23ECD89-67CB-4626-A6A9-7BC66EE28FDE-601-0000010C3B65D689.jpg


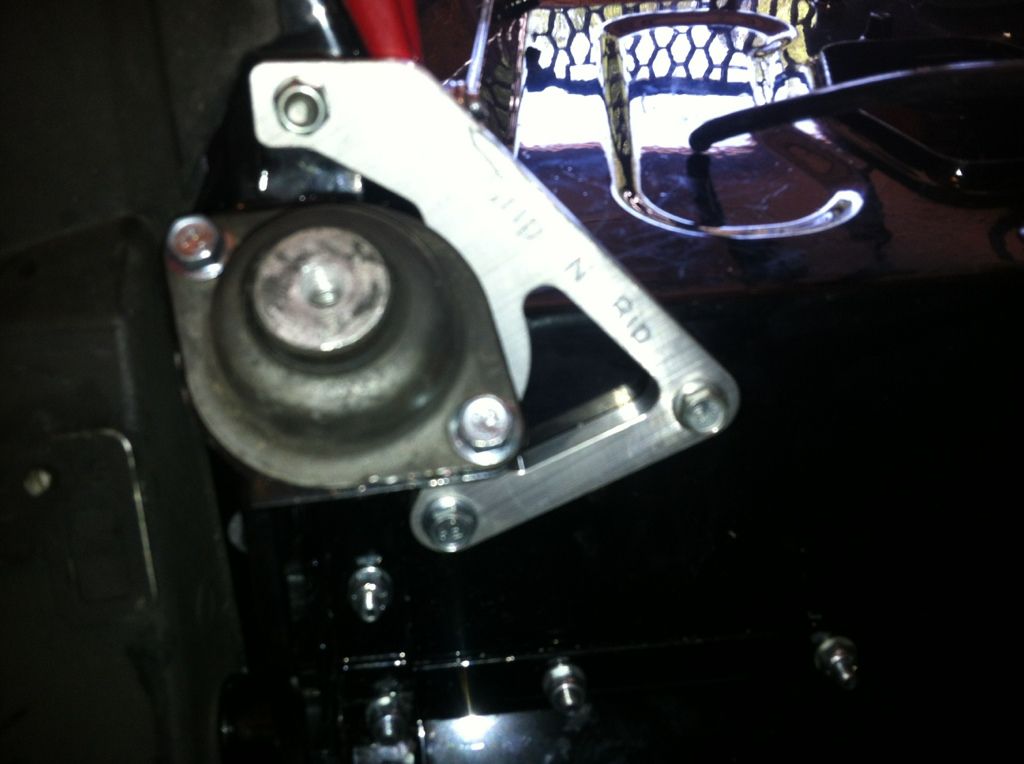
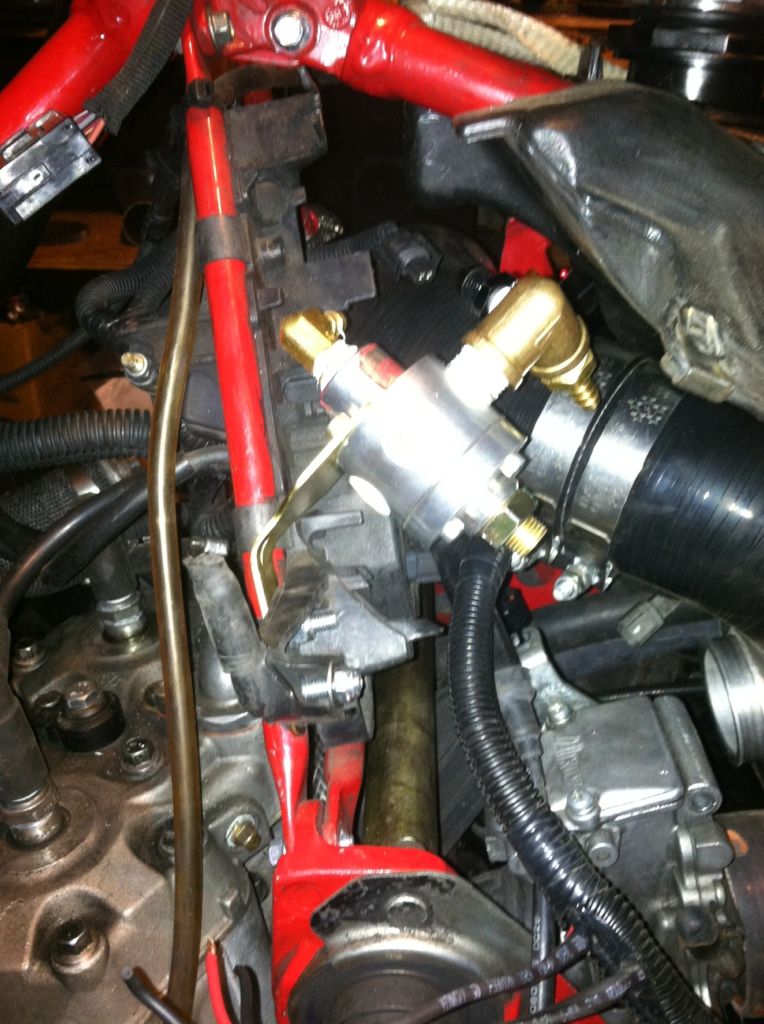
Here is where I mounted the regulator. About the only place that isn't in the way or close to a hot spot under the plastics. I am going to run my old race clutch guard to be safe too.

392B46E9-4D8E-4825-845B-F139B86D90B6-601-0000010C470AD8B8.jpg
 
Premium Features