Install the app
How to install the app on iOS
Follow along with the video below to see how to install our site as a web app on your home screen.
Note: this_feature_currently_may_not_be_available_in_some_browsers
Install: Skinz Protective Gear "Air Frame" Boards, Yamaha Nytro
- Thread starter christopher
- Start date
You are using an out of date browser. It may not display this or other websites correctly.
You should upgrade or use an alternative browser.
You should upgrade or use an alternative browser.
FIRST RIDE REVIEW.
Yesterday was my first chance to take out the sled with the new Skinz Air Frame Boards on it and give them a try.
As I was riding I was trying to come up with words to describe these boards..
AWESOME
AMAZING
PHENOMENAL
The boards were WAY BEYOND my wildest expectations!!!
Lets look at some photos.
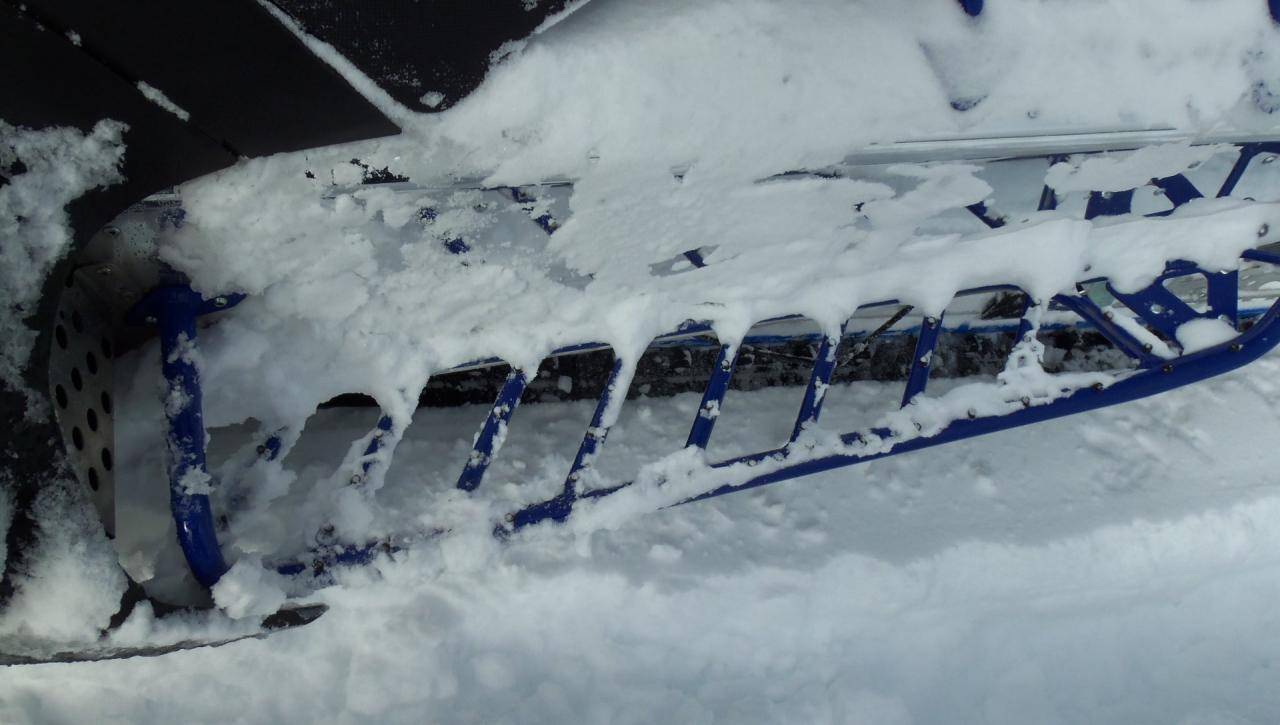
Mid-Day, deep in the snow, tunnel is running DEEP in the powder with the snow nearly touching the bottom of the boards. And there is nearly NO SNOW on the boards where your boot would make contact!

#1.
Snow Retention was for all intents and purposes ZERO.
As you can clearly see there is NO ICE and NOT any meaningful snow at all on the boards.
The only real snow that adhered to the boards was along the inside edge where the board attached to the tunnel and where my boot never touched the boards.
#2
Traction was simply UNBELIEVABLE.
There was ZERO slippage or movement of my boot on these boards.
NONE!!
When you planted your boot, it felt like it was RIVETED TO THE SLED.
You and the sled were BONDED together on these boards.
No matter where I placed by boot, it had a ROCK SOLID BITE on the boards.
#3.
Rigidity of the sled/tunnel was significantly increased.
There is absolutely NO FLEX AT ALL on these boards.
They are rock solid, and I weigh in at 230lbs!
#4.
Weight Transfer was greatly enhanced, and this was TOTALLY UNEXPECTED.
The rear of these new boards have a small section where the board rivets to the upper wheel hanger.
This small flat spot and the support bar that attaches to the tunnel, once studded, allowed me to place a boot there and transfer my weight to the very back of the sled which significantly improved my ability to turn!
Yesterday was my first chance to take out the sled with the new Skinz Air Frame Boards on it and give them a try.
As I was riding I was trying to come up with words to describe these boards..
AWESOME
AMAZING
PHENOMENAL
The boards were WAY BEYOND my wildest expectations!!!
Lets look at some photos.
Mid-Day, deep in the snow, tunnel is running DEEP in the powder with the snow nearly touching the bottom of the boards. And there is nearly NO SNOW on the boards where your boot would make contact!
#1.
Snow Retention was for all intents and purposes ZERO.
As you can clearly see there is NO ICE and NOT any meaningful snow at all on the boards.
The only real snow that adhered to the boards was along the inside edge where the board attached to the tunnel and where my boot never touched the boards.
#2
Traction was simply UNBELIEVABLE.
There was ZERO slippage or movement of my boot on these boards.
NONE!!
When you planted your boot, it felt like it was RIVETED TO THE SLED.
You and the sled were BONDED together on these boards.
No matter where I placed by boot, it had a ROCK SOLID BITE on the boards.
#3.
Rigidity of the sled/tunnel was significantly increased.
There is absolutely NO FLEX AT ALL on these boards.
They are rock solid, and I weigh in at 230lbs!
#4.
Weight Transfer was greatly enhanced, and this was TOTALLY UNEXPECTED.
The rear of these new boards have a small section where the board rivets to the upper wheel hanger.
This small flat spot and the support bar that attaches to the tunnel, once studded, allowed me to place a boot there and transfer my weight to the very back of the sled which significantly improved my ability to turn!
S
So what do you think ?
Would you do the air frame install again?
Do you like the end result?
Have you got to ride the sled yet?
Would you do the air frame install again?
Do you like the end result?
Have you got to ride the sled yet?
Similar threads
- Replies
- 13
- Views
- 6K
- Replies
- 1
- Views
- 779
- Replies
- 3
- Views
- 4K
M
- Replies
- 11
- Views
- 3K


