• Don't miss out on all the fun! Register on our forums to post and have added features! Membership levels include a FREE membership tier.

Next build GEN 3 snowbike, home build project

swedenturbo

Well-known member
Lifetime Membership
Dec 4, 2009
330
397
63
Sweden
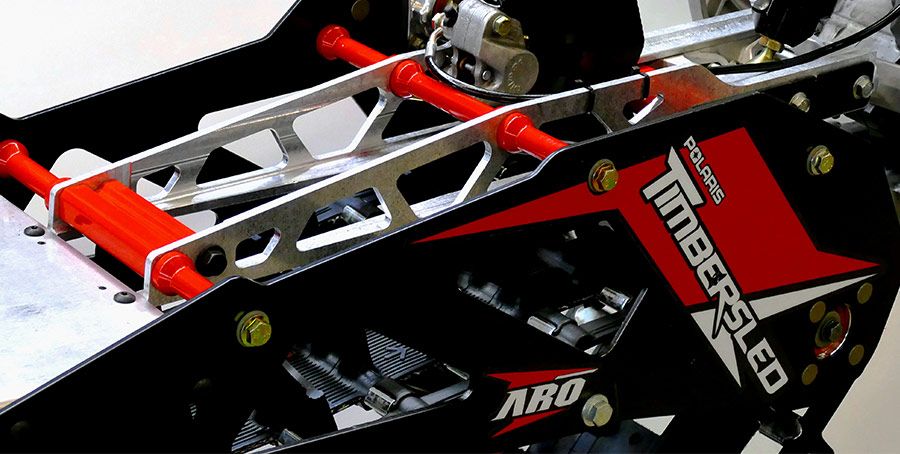
My cobuilder Jonas has fixed his sprocket failure in the outer chain transmission. The sprocket came off the shaft. This was the only sprocket on the drive train that we tested to weld directly on to the shaft, which obviously was a bad idea. With this insight, we will onward mount all sprockets with either a keyways or flange bolts. Keyways has worked flawlessly on our previous builds. Splines are of course the best solution but not easy to machine for the home builder.
1ecd7cee75a620b48c330faa69af21bc.jpg

The failure probably started with micro cracks in the weld caused by vibrations or impact stresses from stallings or similar. The weld could certainly have been better executed, but none of us are qualified licensed welders. Possibly the difference in material properties between sprocket and shaft that at the end made a poor weld. Differeces in alloys, hardening etc. makes welding more difficult. Pre heating and type of filler material is something we do not have knowledge of, but are certainly important for a strong weld as in this aplication.
Our prevuios builds has shown that a 20 mm key will easily take the stress despite a powerful turbo bike and a long tall lug track that hooks up strongly.
2f87da28e925c0c5ae935ce9047b16d5.jpg

6416d21d3ead4acc1cb428e32a08ebd1.jpg


We feel that the gearbox is completely different on the 2017 KTM500 compared to the 2016 500.
1:st-5:th has a more close ratio while 6:th jumps up quite much.
Honestly, I like the gearbox ratios on the 2016 better. The 2017 will work good as a standard naturally aspirated, but with the turbocharger it can easily pick up power with greater speed differences between gears. I rather like to have larger jumps between gears instead of constantly hitting the revlimiter shortly after each gear shift.
To increase the speed difference between the gears and considering the 6th gear as more or less useless overdrive, we tested to gear up from 16 to 17 teeth on the jack shaft in the outer transmision.
The gearing was felt clearly better but we want to increase gearing further.
Ordered a 18 tooth sprocket and machined it with keyway slot ready to go on. When I tried to assemble everything, the chain was obviously short. This idea was a complete miss and all work gone in the scrap bin.
Have ordered a 15 tooth engine sprocket. Currently running 14 teeth. 15 tooth should provide an equivalent ratio increase. In addition, the chain will have greater clearance around the swing arm bearing which will be an improvement.
4e5b599553fbe88639015e3a52f6fb87.jpg


Mounted a Koso Stage 6 muliti guage with tachometer, hourmeter, speedometer and temperature gauge.
The temperature sensor is inserted in an intermediate aluminum tube piece on the hose from the head.
Cut the hose and machined a hose joint with the same overall dimensions as the temp probe piece to the corresponding part of the U-hose.
Was not satisfied because the hose bend ended up to be too tight that the hose had a slight crease. Ordered a new aftermarket 19 mm U-hose. A better result as I could go directly from the probe piece to the thermostat housing.
4f8aa12601349b31ebe8040c0b09c795.jpg
 

CATSLEDMAN1

Well-known member
Premium Member
Nov 27, 2007
2,630
1,207
113
75
Missoula, Montana
shaft failures

the kits we built 4 years ago and our 2014 TimberS kits all eventually experienced sprocket / shaft failures at the keyway. Latest count was 5 fatigue cracked shaft, bolts no long stay tight, two sprockets have broken in half, we have replaced all before the end of the shafts have broken.

A shaft with a key way and a male thread on the end and a nut for tightening might eliminate the problem. In the late 90's the sled mfg had the same issue even with splines, and they were pretty much eliminated the broken shafts when the male thread replaced the tapped hole for the bolt.
 
K
Jan 2, 2016
19
11
3
Could you tell what supplier you are using for sprockets?
They look like just bulk industrial sprockets?
I'm asking because I'm wondering if they hold up.
I have experience with industrial power tranfer chains and they gave up within 20-30km, but 530 motorcycle chain worked fine.
Sprockets used then were parts from motorcycles so they held up fine. In future it would be nice to use industrial sprockets since they are way cheaper and easier to get in right sizes.

In your bike they seem to work fine with 100hp class power under 20T size, but I'm planning to use +200hp so not sure they can handle that.
I would appreciate any further info about sprockets and methods to join them to axles.
 

swedenturbo

Well-known member
Lifetime Membership
Dec 4, 2009
330
397
63
Sweden
We use sprockets for industrial applications. There are avaliable in both hardened or unhardened teeth.
images

SKF is one of many manufacturers of industrial sprockets. They are not sold in regular stores but from suppliers of industrial transmissions.
These 5/8" pitch sprockets have a tooth width of 9 mm that fits a 530 chain.
We use a 520 chain. This requires a tooth width of 5.8 mm. We haven't found any industrial sprockets with that width so we must machine down the width. Hardened teeth are possibly better but is a little harder to machine.

You are right that the chains of industrial quality is really bad on a snowbike. I tested these on my very first build but they were worn out pretty quickly.

We now always use motorcycle O-ring chains of high quality. Have worked very good.
Always lube chains before each ride.

If you build something with 200+ horsepower, I think that a 530 chain to hold up good.


Of all sprocket mounting methods we have tested, a flange is probably the best. It requires more machining and a bearing with large inner diameter that fits around the flange. We use this method on our current aluminum drive shaft.
This is probably not a mounting method you choose on all sprockets but can be a good reliable solution in some applications.
5965f53b7b95b89502b115746b41d448.jpg


bac69f3a523aebc311f97a529c406ad5.jpg


e7587a73cba14540f9ade3bc17c492f5.jpg
 

swedenturbo

Well-known member
Lifetime Membership
Dec 4, 2009
330
397
63
Sweden
The original plan was to have a slightly lower seat height but when everything was completed the result was basically the same as our GEN2 snowbike.
You can possibly shorten the strut slightly to get it lower.

Most snowbikers has seen pictures of the brand new Timbersled ARO platform.
There are some similarities to our build such as it has an aluminum frame instead of welded tubes.
We have noticed that our frame has less torsional rigidity in the rear compared to welded tubes.
At first we thought that this would be a problem and the solution would be to try increasing torsional rigidity by using some form of cross-brace.
After a period of trial runs, we have decided to leave it without action, at least for now.
We assume that this form of rigidity may not be as important on a snow bike.


After studying the new ARO extruded aluminum frame, we assume that this likely does not offer higher rigidity than ours.
Timbersled has probably made same assessment as we did.
e6e5e407fdd028c14a6475e7e44c698e.jpg

aro-chassis_png_zpstdisky8h.jpg
 

swedenturbo

Well-known member
Lifetime Membership
Dec 4, 2009
330
397
63
Sweden
Generally, our Gen3 snowbike feels like a really promising design!
From our first shakedown tests, we encountered some minor glitches such as a break in the rear upper shaft of the suspension. That's what you can expect when building a prototype. First we tested an aluminum shaft but unfortunately proved to be too weak. Steel or titanium shaft is the solution. We all look for both low weight and durability, which is an everlasting balance in engineering...

The suspension feels really good, especially thanks to the third shock!
Our first idea of lockable third shock is in theory good, but does not work in practice. These shocks will not offer that firm lock that we first looked for.

Our first idea of using a MTB-shock works really good but could possibly require a greater leverage in the linkage in order to get a firmer suspension. So far, I’ve ridden with maximum air pressure in this shock and maybe this is sufissiant, but it would have been really good to leave for a little headroom ...

A solution to this issue, my cobuilder Jonas has built a reworked linkage and with a different MTB-shock. This new linkage design provides more leverage and wider range of setup options. As the leverage increases, the suspension travel decreases, which however is not a problem because this third shock works with limited travel. The main suspension travel is taken out in the main skid suspension.
So far, this solution requires more comparative testing to see if this modication will provide desired improvement.
72afd892f253a8a727271c80c07c0232.jpg

6195d7fb0394199bc88280f15504c6e6.jpg

0a721e82800168ba18fde3233b5c694f.jpg

66f7f757b99f82ae5935ecb327a1b285.jpg

85d441238d247b4124bae186109beef4.jpg
 
Last edited:
Durability

Your builds have been a great inspiration for me!

I am in the process of designing my own rails. What thickness and aluminum grade did you go with and how has been the durability?

My current design is using a 3/8'' (9.5mm) thick 6061-T6 rails with a .900 (22.86mm) wide bottom section for the hyfax.

My design includes a polaris rush style progressive rear suspension, but inside the skid
 
M
Jan 14, 2004
3,079
1,390
113
Iceage uses 7075 I think at least, if you use 6061 don't powder coat them, you can anodize for color but powder can change the temper depending on oven temperature which weakens the part.

M5
 
S
Feb 5, 2017
20
0
1
Hello Hakke.
Was wondering if you are planning on making a gen 4? Playing with the idea of making my own kit. Do you have a set of plans for gen 3 that you would share if you don't mind? Thanks
 
Last edited:

swedenturbo

Well-known member
Lifetime Membership
Dec 4, 2009
330
397
63
Sweden
bb2641eeb5f500edf4a363317e9e0ba5.jpg

We learn more for every year of designing and riding our home built snowbike kits.
As you probably seen in this thread, this is an everlasting developement project with tests and continuous improvements.
The recent season, we have made many thorogh tests of our design to find flaws and areas of improvements.

We are very pleased with the performance! Especially the suspension has proven to work extremely well. As a comparison, we also ride an Yeti 129” with RRS strut. In this comparison we think our GEN3 snowbike suspension is performing better in some areas.

Our tests of a different linkages of the third shock didn’t improve the suspension as planned. Going for a for a frimer springed shock like a MTB Rockshock looks to be a better solution with more predictable and progressive action. At least this our opinion for now...
e4bd169b0a3b741fdd714a55c7cb8e5f.jpg


The plan is not to build a Gen 4 but instead update to Gen 3.5.
As the suspension worked so well, we will keep that untouched but instead improve in other aspects of the design.

Some idler wheels will hopefully improve hyfax wear.
0a42245b295e37a7c01ce98541541394.jpg

There are still a number of areas left for improvement.

The design of the rails have proven to be too weak. The stresses from the rear axle end up in unfavorable forces in the rail. This led to too much stress in the upper part of the rail ending up to failure. The solution is simple to solve, because the design looks nice but obviously not optimal by structural standards. A quick fix is by bolting a brace that transfers the force to the lower part of the rail.
We will revise the design of the rails that this failure will not happen again.
92d2546beef0e147ecd7c8a444957f2f.jpg

ca12066156abe4621b693447fc92625f.jpg


Although the frame has proven to work well, it can be made more rigid. We see the weaknesses and will be improved primaliy by increasing structural deign closest to the swing bearing.

The drive shaft works very well also with very low weight. The large bearing closest to the drive sprocket has worked very good with better leliability that we’ve expected. Flange mounted sprockets is a very nice solution with no issues.
b67222b0753b828461556db47dd90a86.jpg


On the other hand, jackchaft has many areas of improvement.
It is very difficult to disassemble ending up that the whole tunnel panel has to be disassembled in order to have the jackshaft free for mainenace. We look for a design that the whole jackshaft assemby as a whole can be disasembed easily.
Simplifying tensioning the PTO-chain by moving the whole track kit is a nice solution but not easy when you have the strut connected to the frame. This tensioning solution will require some inrigure design that we will look at.
9f6aa7cf4a718ddaf76e06f314670c14.jpg

The clearance between the tunnel top and track lugs has proven to be too tight. There are obious wear marks on the tunnel top from the lugs. This flaw robs a lot of power. We will increase the clearance so the track runs freely no matter of suspension travel or snow conditions. Not clear what this alternation will reqire but likely a new frame design.
Our shaft/sleeve mounting method on the frame is simple but leaves less rigitity and less clearance of wear. Larger wall thickness of the sleeves can hopefully offer better rigidity. Maybe other solutions will work better...
d60640b9f124ddcee73154e5557416f4.jpg


Apart from all these shortcomings, we feel we have a really good snowbike kit that will at the end of all these improvements work really awsomelly!

We have no drawings uploaded of the GEN3-kit but if you want to build a homebuilt kit, there are drawings uploaded on our GEN2 kit in my previous thread.
d61e8ba0272c9dbc176e232f7b79877b.jpg

Hoping that we will see more homebrew kits in this Snowest forum section!
A really fun and rewarding project.
I try to share all my experiences, design flaws so hopefully more people here can learn more about building your own snowbike kit
 

swedenturbo

Well-known member
Lifetime Membership
Dec 4, 2009
330
397
63
Sweden
No, I do not own a water jet. Hiring a shop that have such of a machine.
It works very good to cut aluminum parts up to a thickness up to 30 mm.
The rim of our chain case is one of the parts that we cut out using this water jet. Large thickness works, but not as accurate as the jet deflection doesn’t get a spot on 90 degrees cut. When tight tolerances is reqired we finish the part with machining. Thinner thickness cuts looks to be pretty spot on.
I mail the shop a DWG-file and get the parts cut. I try to CAD most bolt holes that makes it easier to align and assemble. It reqires a lot of CAD-planning so everything fits correctly.
Most people seem to think that you just order some water jet cut parts and bolt it together. That is just the first step. There is a lot of work left in machining, lathe turning until you have all parts ready for assembling.

In northern Sweden we do not have as much snow as North America and Canada. Normally we get about just 2-3 feet of snow. We mostly ride in the trees. Here we all know that snowbikes shine among the trees and this feels extra fun in our Swedish terrain!
We also ride in the mountains near the Norwegian border. Interesstingly is that there is clear line with no trees here above 1200:isch feet. Here we find some awsome steep climbs with no trees.

Finally a callout to you all forum members:
Most posts on this forum has no photos! You guys have many legit snowbike questions and other interesting feeds about your bike but no photos! I know that the Snowest forum has an akward way for the user to upload photos on the forum. We all like to see photos of your bike! I highly suggest you all get the Tapatalk app. With this app, you can easily add a photo to your feed directly from your phone photo library. All my feeds with photos are made in this app. Added some random photos in this reply to make this post more interesting to read. There are probably other apps than Tapatalk, but for me it have worked nicely.

e09b2fd368d65c3ae2c672d1c2f8eeb4.jpg

50658d8ddb759511ee273bcdbb3afb26.jpg
84d4d215a9b58c0c44370afe091e3989.jpg

I visited the Daytona 500 2018!
bef68e5bd07704fb5a46b735f2968283.jpg

My road bike. A Yamaha MT10
2cadc2842912bc23c6d7ca6396b2208a.jpg

My GEN2 snowbike on a KTM 125
1deee90258e5ba9e5f6ec8c67ac9885c.jpg

A Swedish snowbike gettogether event. Of all bikes, no Timbersleds....
e180469b102b30d86a9e27e0f16dcf18.jpg
 
Last edited:
E
Dec 19, 2007
1,039
657
113
52
Your projects always look so clean.
Have you run it much with the 3rd shock locked? Your skid/shock setup looks really good and I would bet it would work really well even with out the 3rd shock. I have been building strutless frame backbones on dedicated snowbikes with good success with no 3rd shock.

You should try putting a marine fuel tank on the back and leave the front tank empty. It makes the front feel sooooo much lighter. Moving 15 pounds from the front to the back is a 30 pound difference in ski pressure.

I love the 125! My summer bike is a ktm150 and I would love to try it in the snow some day...
 

swedenturbo

Well-known member
Lifetime Membership
Dec 4, 2009
330
397
63
Sweden
Trough the years we have tested both rigid and suspended strut.
A rigid strut works okey but a third shock is undoubtly the best.
Most suspension work is done in the skid and by this you can control many variables of the interacion between snow and track. The third shock has to be quite firm and with fairly short travel but will smooth out those really hard woops and will offer a smooth ride..
Also by the travel action in the third shock, will act like a hinge of the bike that will tighten the radius of tight turns. This hinge feature is probably felt more on long track bikes.
Our initial Fox MTB shock had a lockout feature that in theory looked to be awsome but in reality, it hadn’t a real mecanical lock but instead a hydralic valve that firms up the shock.
Really like the idea of the option to lock the third shock but that looks to be hard to find on current shock designs. We finally rode it in the unlocked mode and probably we would kept it unlocked if the shock would have had a mecanical lock...

Not sure about the idea to put all fuel in the rear. We think that current setup has the optimal weigt disribution. With full fuel and a Rotopax 1 gallon extra fuel tank in rear, the center of gravity is just slightly aft of the footpegs. We think that the center of gravity close to the footpegs is the desireable target on most current dirtbike conversion snowbike designs.

We have tested a custom built 2 gallon extra tank made out of aluminum.
This extra tank design is removable to manually fill the bike tank. We will later on test the idea of a feed hose from the extra tank connected to the air breather of the bike fuel filling cap. By this design, the rear tank empties first as the breather undrepressure pulls fuel to the bike tank. We are not sure if this idea will work but worth testing...
The fuel height difference between front and rear can be pulled by the fuel pump but probably not on a gravity fed carb bike.
5bec5a9e123a908d08bf3c04ddd45468.jpg

cfd74f6103c5fc1d20ecc22bcbc9ea29.jpg

9dabe976d125ecdbadcd89506a5fc073.jpg

5a81655853b1ae46edc5df02092d9552.jpg
 
W
Apr 7, 2018
1
0
1
39
Idler wheels

Awesome builds you produce, I'm currently designing my own home build on CAD and I noticed the idler wheels you have added to the bottom of the shock to improve hyfax wear. I'm in need of some similar and was hoping you could tell me where you get them from and what diameter they are?.
cheers, Dan.
 

swedenturbo

Well-known member
Lifetime Membership
Dec 4, 2009
330
397
63
Sweden
Despite no posts in this thread in recent time, the build is still in progress
Just waiting for new rails to be water jet cut and then its ready for snow!
2be754c543c0699d6af3c3d18768e9ce.jpg


The rail design had some flaws and broke at the rear.
fcb374e6e76f4eab6f9fbbc98d308c5c.jpg

A new truss design will hopefully improve strength and rigidity.
2eadab84db92ad26d6fad3963395fea0.jpg
 
Premium Features