Install the app
How to install the app on iOS
Follow along with the video below to see how to install our site as a web app on your home screen.
Note: This feature may not be available in some browsers.

Camo Extreme Track Swap
- Thread starter IceCap
- Start date
You are using an out of date browser. It may not display this or other websites correctly.
You should upgrade or use an alternative browser.
You should upgrade or use an alternative browser.
I have done it, its just like any other sled. take the gear or what ever it is called off of the drive shaft that is for the speedo. it makes it easier to pull. I also pull the chaincase. it is well worth it
You don't need to pull the chaincase. You'll need to pull the gear and remove the chaincaise oil (this can be left in if sled is on it's side but makes a mess). Two people make a world of difference as one can move the track while the other can move the shaft. Wear gloves, there are lots of sharp edges in the rails and in all the Al.
Stock track is around 50lbs and CE is around 55lbs at 155".
Stock track is around 50lbs and CE is around 55lbs at 155".
You don't need to pull the chaincase. You'll need to pull the gear and remove the chaincaise oil (this can be left in if sled is on it's side but makes a mess). Two people make a world of difference as one can move the track while the other can move the shaft. Wear gloves, there are lots of sharp edges in the rails and in all the Al.
Stock track is around 50lbs and CE is around 55lbs at 155".
I am having a 5.1 shipped to me right now and the ship weight is 45 lbs. Not sure if the guy pulled one past UPS, but that is right on the scan of the label he sent me (with shrink wrap).
I am having a 5.1 shipped to me right now and the ship weight is 45 lbs. Not sure if the guy pulled one past UPS, but that is right on the scan of the label he sent me (with shrink wrap).
I think the weight might have been 45lbs and 51 lbs. There was 5.8 lbs difference, I just couldn't remember the actual weights.
did anyone install the camo extreme with a 2.5 on the new pro?
This is the track I am referring to.
What gearing did the 155" come with? I don't think anyone has recieved there 163" yet. I haven't got mine.
Just install CE yesterday on my pro. Found the install easier than installing on IQ. There is a little more room (on the pro) at balk head as the front exchanger was deleted. Here is steps I used.
1. Remove drain plug in bottom chain case.
2. Remove both side panels.
3. Remove screw back edge of left side foot stirrup be careful as factory lock tight caused threaded insert to spin on my sled had to drill out head of screw. Might be best to heat threaded end of screw to release lock tight.
4. Remove belt from driven pulley can be left on clutch.
5. Remove driven pulley and shim washers careful not to lose them.
6. Remove the 13mm nuts that hold drive axle to tub. Remove gasket between bearing holding plate and plate that mounts to tunnel. Be careful gasket it is very easy to damage.
7. Back off track adjusters all the way and remove suspension bolts on left side.
8. Roll sled on left side place a 6 inch wooden block under handle bar end this will protect plastic and sled will be level.
9. Remove brake caliper and rotor. Muffler does not need to be removed.
10. Remove chain case cover, this will require a little prying as the jack shaft has a ‘O’ ring that seals the inside race of bearing mounted in cover. Cover has 2 little ears on top 2 holes that are made for this careful not to damage cover gasket and mating surfaces.
11. Remove bottom sprocket only, also remove chain and adjuster. Sprocket bolt maybe stubborn place a pry bar through track window up against front suspension arm to loosen bolt.
12. Remove right side suspension bolts and remove suspension.
13. Remove drive axle from tunnel will require a little wiggling. Remove track.
14. Install new track in tunnel. MAKE SURE IT IS GOING IN RIGHT DIRECTION.
15. Place drive shaft back in tunnel bearing end first. Clearance is tight between track and tunnel will require wiggling and prying to get drive lugs past drive sprockets. Push drive shaft up into chain case bearing just far enough to get the sprocket bolt with washer threaded into shaft, this will prevent shaft from falling back out. Be careful of the oil seal while installing shaft as sharp edges on shaft will damage it.
16. Rolling sled back to left side gravity will help get the drive sprocket track over drive lugs of track will need to pry and wiggle things.
17. Reinstall bearing plate and mounting plate to tunnel driven pulley and drive belt.
18. Re-attach plastic fender to foot stirrup and install left side panel.
19. Reinstalling suspension is easier if rear track is pulled out away from tunnel and supported so as to be level. Install front of suspension first then work rear in. Install front suspension arm bolt (clean bolt and use lock tight). Do not install rear bolt it will make it very hard to install other side bolts.
20. Roll machine over other side reinstall chain and sprocket (clean bolt and use lock tight). Replace adjuster, tighten chain. Pour in 9 oz chain oil. Apply a little grease to ‘O‘ ring and install cover pushing down on both sides opposite jack shaft. Make sure cover ‘O‘ ring, seal stays in groove.
21. Reinstall brake rotor and caliber (clean bolts and use lock tight).
22. Install bolt in front suspension arm then rear arm it is easier if you lock brake and use pry bar through track windows against arms (clean bolt and use lock tight).
23. Tip to other side reinstall last suspension bolt. (clean bolt and use lock tight).
24. Right machine lift rear and adjust track.
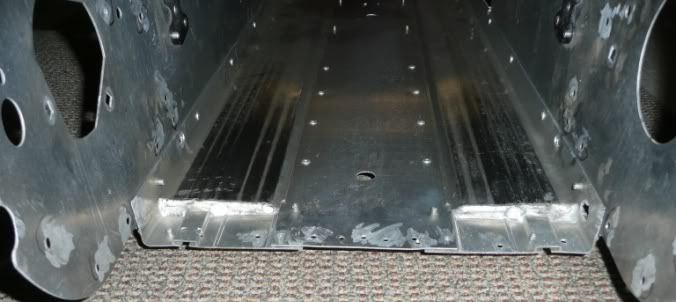
The clearance at the front has never been the issue... The clearance at the roof of the tunnel has been the issue and remains the same distance on the PRO Chassis as the IQ chassis...The skid-marks on the roof of the tunnel are the proof in the pudding.
It is not if you can get the track to fit... But if you have enough clearance... which is not ideal on the stock track either... HP to be had with more room.. good thing that there will be two different extended chaincases available this year for this chassis (no D&R's as the jackshaft is already laying on the bulkhead)
What you see on most RAW Chassis tunnel roofs (the tunnel in this pic is removed and upside down)
ALSO.. there is a new design Camoplast Extreme this year..
I just got off the horn with Camoplast...
They have 2 new tracks
A New Design Camoplast extreme in the 153 and 162" sizes
I wish i didn't just read that... That camo came out with two new tracks i just got my new ce for my pro today....
Ran this track on my 09 700 last year as I found the 5.1 lacking traction on windblown snow or icy conditions. I agreed the distance between top of tunnel and top of track is not optimal and does causes track to rub tunnel but stock track also rubs. Believe the rubbing is occurring at higher track speeds and as 95% of the riding I do is under 40 mph so I am not overly concerned with a little rub on top end. In addition moving drive axle will likely require moving suspension back which might change the way sled handles. It may also have an effect on warranty and or resale value. In addition it possible down the road one will have to replace this aftermarket case only to find it no longer available. For some the benefits will justify the purchase new chain case but I think this set up will work very well for me.
Also the new tracks as stated are not for the pro and would require new drivers.
Also the new tracks as stated are not for the pro and would require new drivers.
The looser the track, the more it will hit the top of the tunnel. The old "loose track" for more speed actually can work in reverse. As track speed increases so does the tracks attempt to run in more of an "O" shape.
So a looser track that distorts looses power as speed increases. If you can, find a person running a loose track maybe with extro's and compare his tunnel to a sled with a tight track.
So a looser track that distorts looses power as speed increases. If you can, find a person running a loose track maybe with extro's and compare his tunnel to a sled with a tight track.
L
i installed a 174 3 pitch in a 2010 d8 the other day with the avid 7tooth drivers and you must pull the chaincase right out, and the tunnel clearance is lots now with a bit smaller driver, should work very well. factory drivers can be removed without taking the inner half of the chaincase out.
Ran this track on my 09 700 last year
HUH???
G
The looser the track, the more it will hit the top of the tunnel. The old "loose track" for more speed actually can work in reverse. As track speed increases so does the tracks attempt to run in more of an "O" shape.
So a looser track that distorts looses power as speed increases. If you can, find a person running a loose track maybe with extro's and compare his tunnel to a sled with a tight track.
x2 on that! The rubber left on the front of the tunnel is from the track ballooning under deceleration typically caused by mtn riders who bought into the myth that a loose track is better (ask Camoplast themselves about that myth!).
And I don't know about you guy's Pros but mine has a good 1/2" clearance at the top front of the tunnel. NO extended chaincase needed!
Have FUN!
G MAN
Last edited:
This pic is of a raw tunnel... Same thickness cooler on a Pro-RMK.
In the field this past year... I measured about 5/16 (less than 3/8") at the tightest point in the tunnel... same place and same dimension as the RAW chassis.
I wanted to know about this... before the demo that I did at Seeley Lake.... I made up some differnt thickness sticks on the planer as "feeler gauges"... the 3/8" fit if I pushed on it a bit... The 1/2" was hard to push thru.
The production bulkheads are the same as the demos.
There is a HUGE differnce between a track that "FITS" and one that has optimal clearance.
Heck.. the stock 2.4" track (actually measures 2.3") is a tight fit... ad another nearly 1/4" to that and it gets pretty tight in there.
In the field... the Polaris engineers did not feel this was an issue.... but did not really give any reason or testing methods to back it up.
Lots of good basic fluid engineering behind this.
Bottom line... the Ch Extreeme is a great track... could be made better by having more clearance in the tunnel.
Thanks for all the info guy's, ... So the polaris 5.1 is actually 2.3 inch lug height?
Is the Camo extreme 2.5 actually 2.5 inches?
My brother runs a camo extreme 155" on his 07 700 Dragon and hasn't had any issues with it dragging in the tunnel.
I know more clearance is ideal .... but I think I will just swap out the track with no other mods.
How much heavier is a Camo 163 vs Polaris 5.1 163"
Has anyone geared down there Pro yet?
Similar threads
- Replies
- 26
- Views
- 4K
J
- Replies
- 13
- Views
- 3K
J
- Replies
- 3
- Views
- 2K
- Replies
- 36
- Views
- 4K